I love this guy.
Via MG Siegler.
I love this guy.
Via MG Siegler.
John Gruber has published an amazingly in-depth analysis about the hypothetical display resolutions that could work well for the upcoming new iPhone models, which are rumored to sport bigger displays, at 4.7 and 5.5 inches.
Gruber’s logic is sound, and I agree with his conclusions. It all hinges on this:
But what they have never done, and I believe never will do, is redefine the virtual point to something other than 1/44th the recommended minimum tap target size for every device.
Tap target size has been a constant since the original iPhone, and with good reason. After all, your fingers haven’t gotten any smaller in the past 8 years, have they?
This is just surreal:
Everything here is top notch: The best specs, fantastic build quality, a beautiful screen, a dirt cheap price, and software that, while different, works both aesthetically and functionally. If only the company came up with its own hardware design. If Xiaomi ever does apply itself with some original designs, look out world, because this company will be going places.
If you’re going to copy Apple, this is the way to do it: shamelessly, and with zero regard for any possible legal repercussions. When you don’t have to work too hard on the design, you can focus relentlessly on execution. Samsung could learn a thing or two from these guys.
Barry Lillie:
Only in Italy could an ugly U.S. military motorcycle be the catalyst that led to the creation of a style icon. With over 16 million scooters sold, the Vespa has become synonymous with style, freedom and all things Italian. The name alone conjures up images of beautiful people in beautiful places, an image that was further propagated by Fellini, who had the sultry Anita Ekberg ride one in his cinematic masterpiece La Dolce Vita.
Fascinating read.
They seem to like it:
This has to be by far the most solid feeling Micro Four Thirds lens that we’ve ever handled. It feels every bit as solid and well constructed as a Leica lens would–and indeed it is co-branded with a Leica badge. However, it isn’t weather sealed so we need to keep that in mind when shooting.
It clearly looks like a great portrait lens for Micro Four Thirds cameras, and almost every reviewer is saying so. However, I find it a bit odd that this review doesn’t mention the Voigtlander 42.5mm f0.95 lens, which in my opinion is the closest competitor of the Nocticron.
Voigtlander lenses are famous for their tank-like build. They’re actually every bit as solid and well-built as the M-mount Voigtlander lenses for the full-frame Leica M system. I have held both lenses in my hand and, while the build quality of the Nocticron is exceptional, it’s still quite a while short of the Voigtlander.
Granted, it’s manual-focus only, but ignoring this lens in such a review feels somewhat wrong.
I’m excited to announce that I’ve compiled an anthology of some of my most popular personal essays, and made them available as an e-book. The collection is entitled Raw Materials, and includes revised and updated versions of each piece, with new author’s notes after each one, plus an exclusive extra essay written especially for the collection.
It’s great to have this selection available as a Kindle book. As much as I enjoy Matt’s writing about technology, software development, productivity and the like, I believe his more personal pieces are when he is undoubtedly at his best.1
To me, it’s also interesting to find out which stories he chose to include in the book, because there’s certainly no shortage of great material to choose from in his body of work. As usual, Matt doesn’t disappoint here.
This book is the perfect way to introduce your friends to one of the best writers on the web today. Actually, scratch that. One of the best writers, period.
I still don’t know how his fiction writing is, but I can’t wait to find out.↩
Every day, thousands of people in cities all over the world take pictures as part of their job. You may not have noticed them, but they’re out there: reporters, journalists, writers for online publications and of course, professional photographers. For these people, taking a picture is often only the beginning, as some critical post-processing work needs to be done before the images are ready for publication. And then there’s the publication itself, which may include several more steps. Sometimes there’s not enough time to go back to the studio and everything needs to be done quickly in a mobile environment. This is why so many graphic professionals are used to carrying everything they need with them.
When you look at the whole process, the amount of tools and gear that are needed may seem daunting. And yet, it is entirely possible to build a lightweight, versatile photographic kit for the urban professional. In this article, I’d like to tell you how I built mine, and offer some tips so that your can easily build yours, too.1
It all starts with choosing the right bag for your needs. It’s tempting to go big, I know, after all you never know when you may need some extra space, but in my experience the smaller the bag, the better. Having a small bag forces you to be more carefully selective about your gear, and I’ve found that to be a good thing. Self-imposed restrictions are often a great way to boost creativity and in photography, creativity is paramount. Every decision you can make to help yourself become a better photographer is absolutely worth it. If you only have one lens, for example, your compositional skills will necessarily evolve and adapt, forcing you to learn more than if you could just pick a different one. Having excessive gear can make you lazy as a photographer, so be ruthless about the items you decide to take with you.
It’s also easy to be tempted by highly-specialized camera bags. You know, those bags with a million internal compartments, padded pockets, bombproof zippers, you name it. I suppose they’re fine, but in my opinion they are a lot less versatile than a regular bag and they’re probably overkill for most people. You can get the same results using your everyday bag just fine.
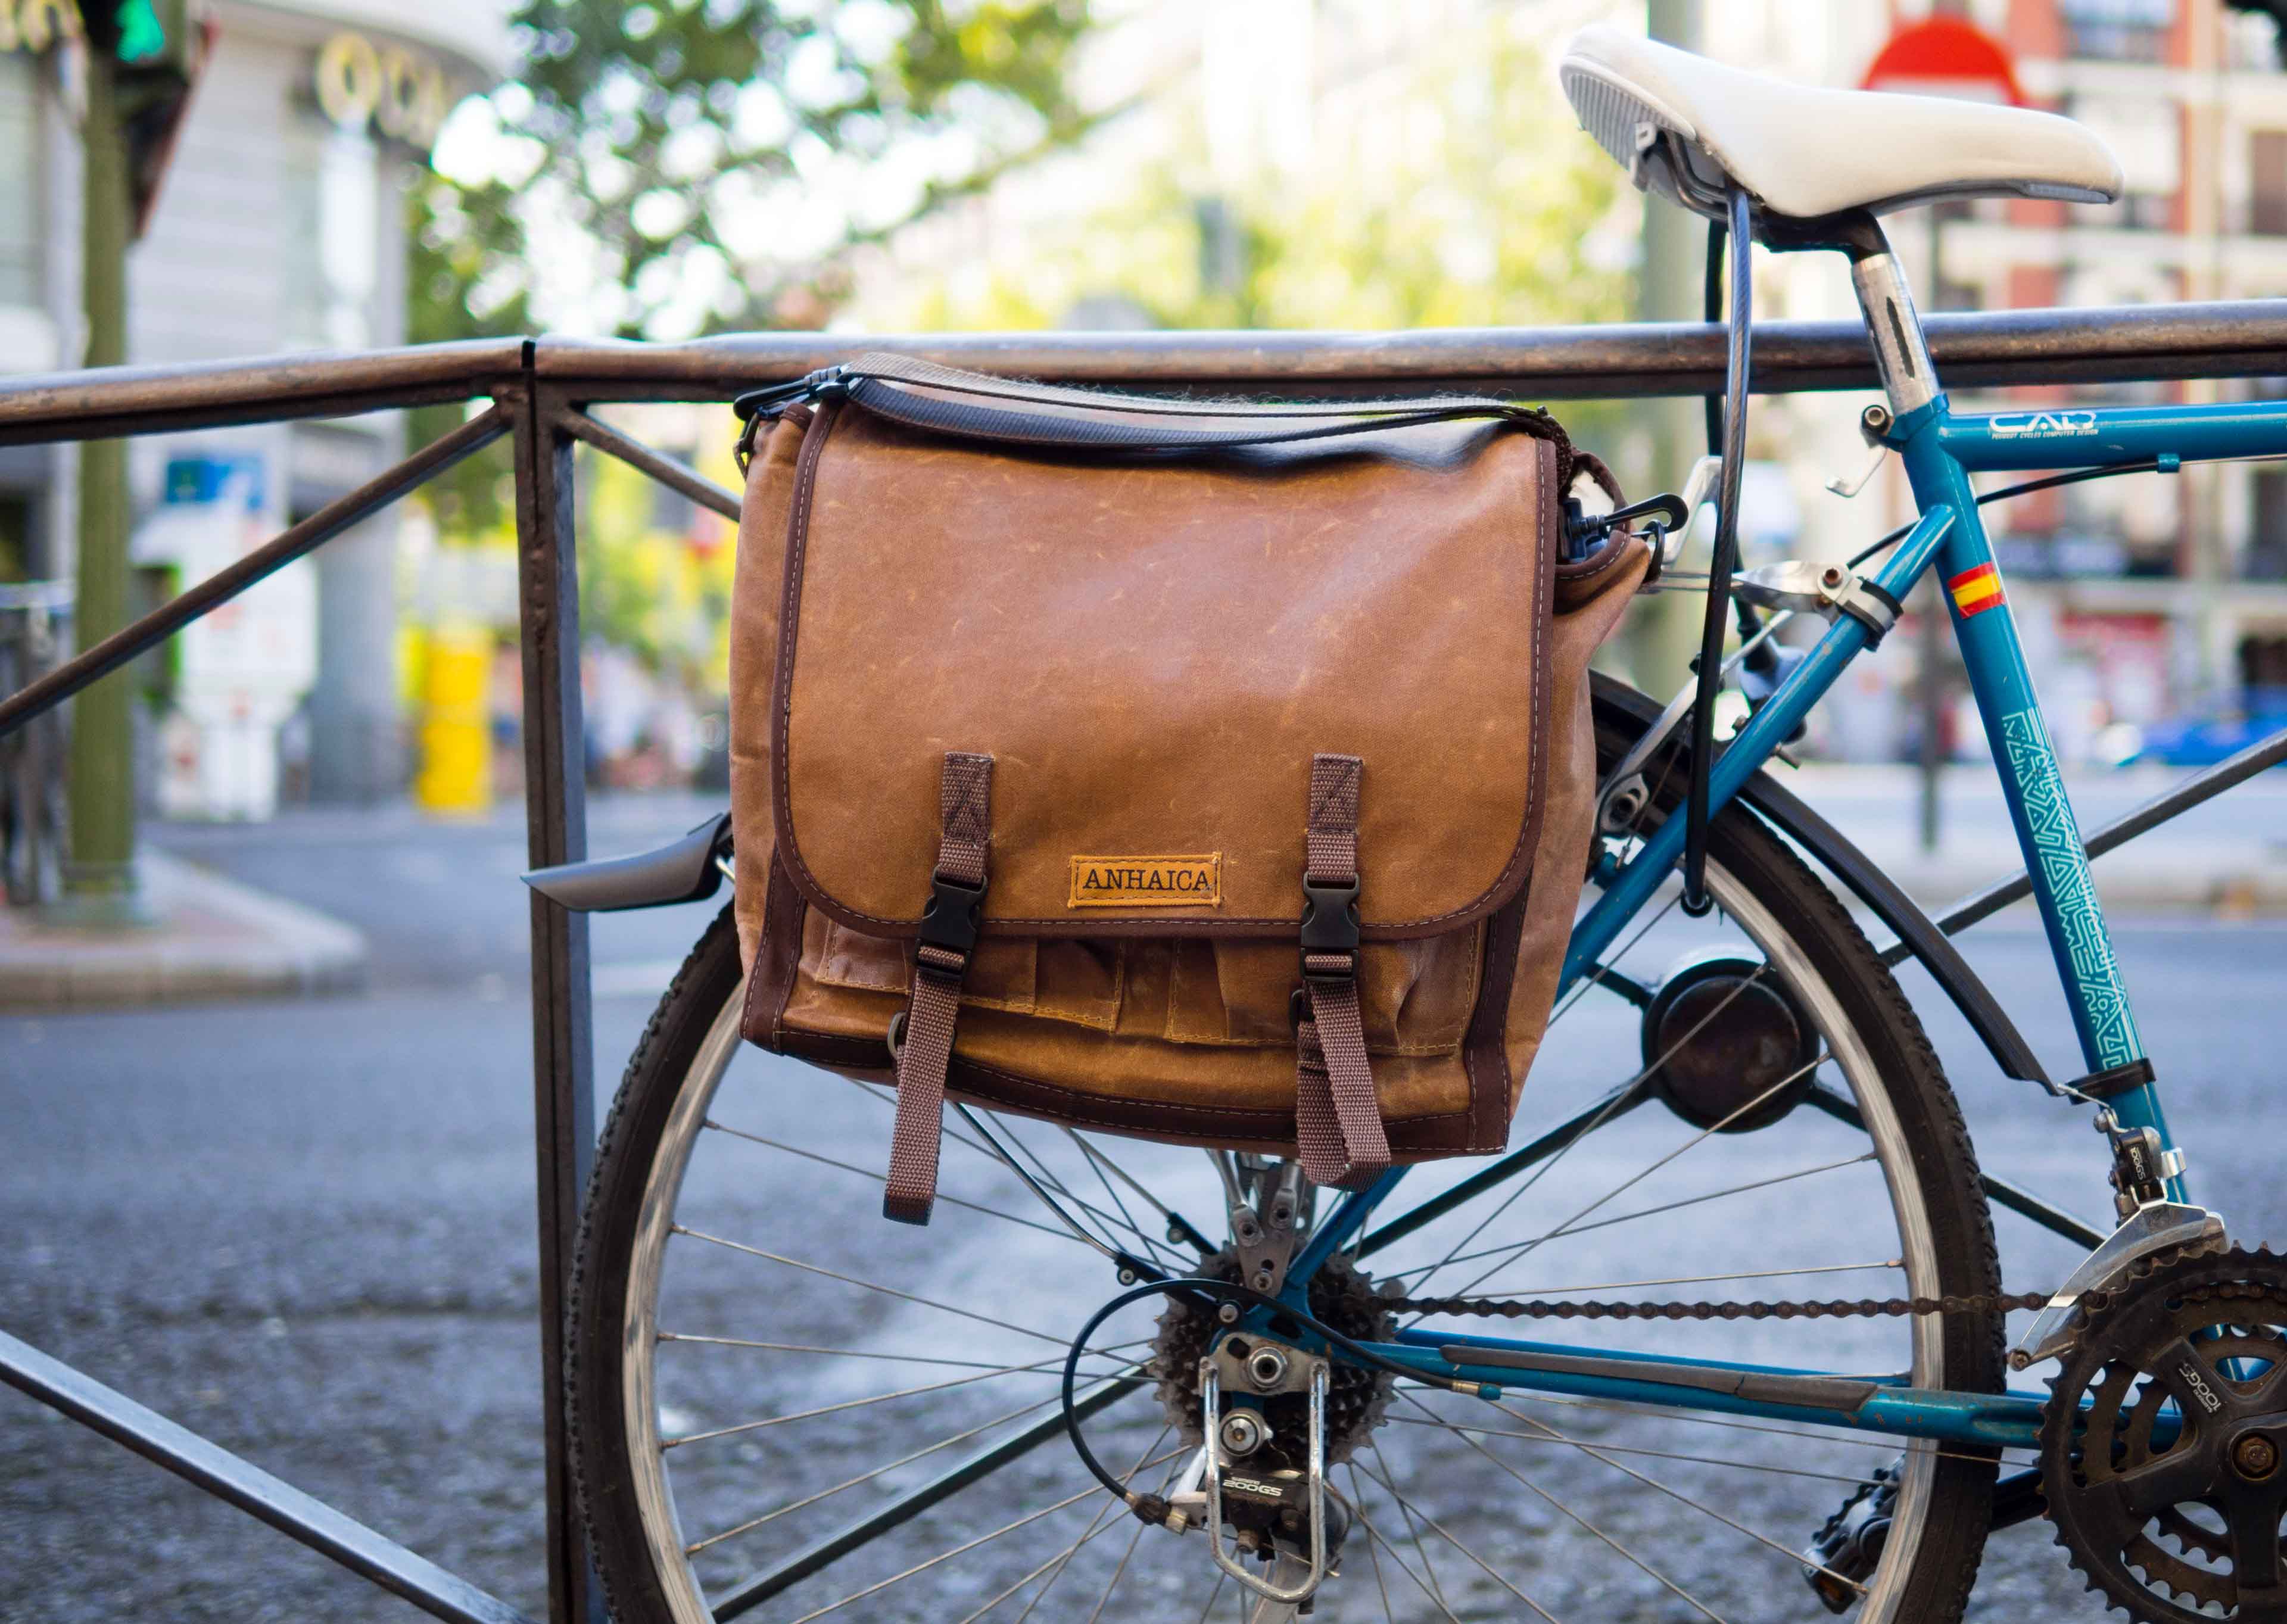
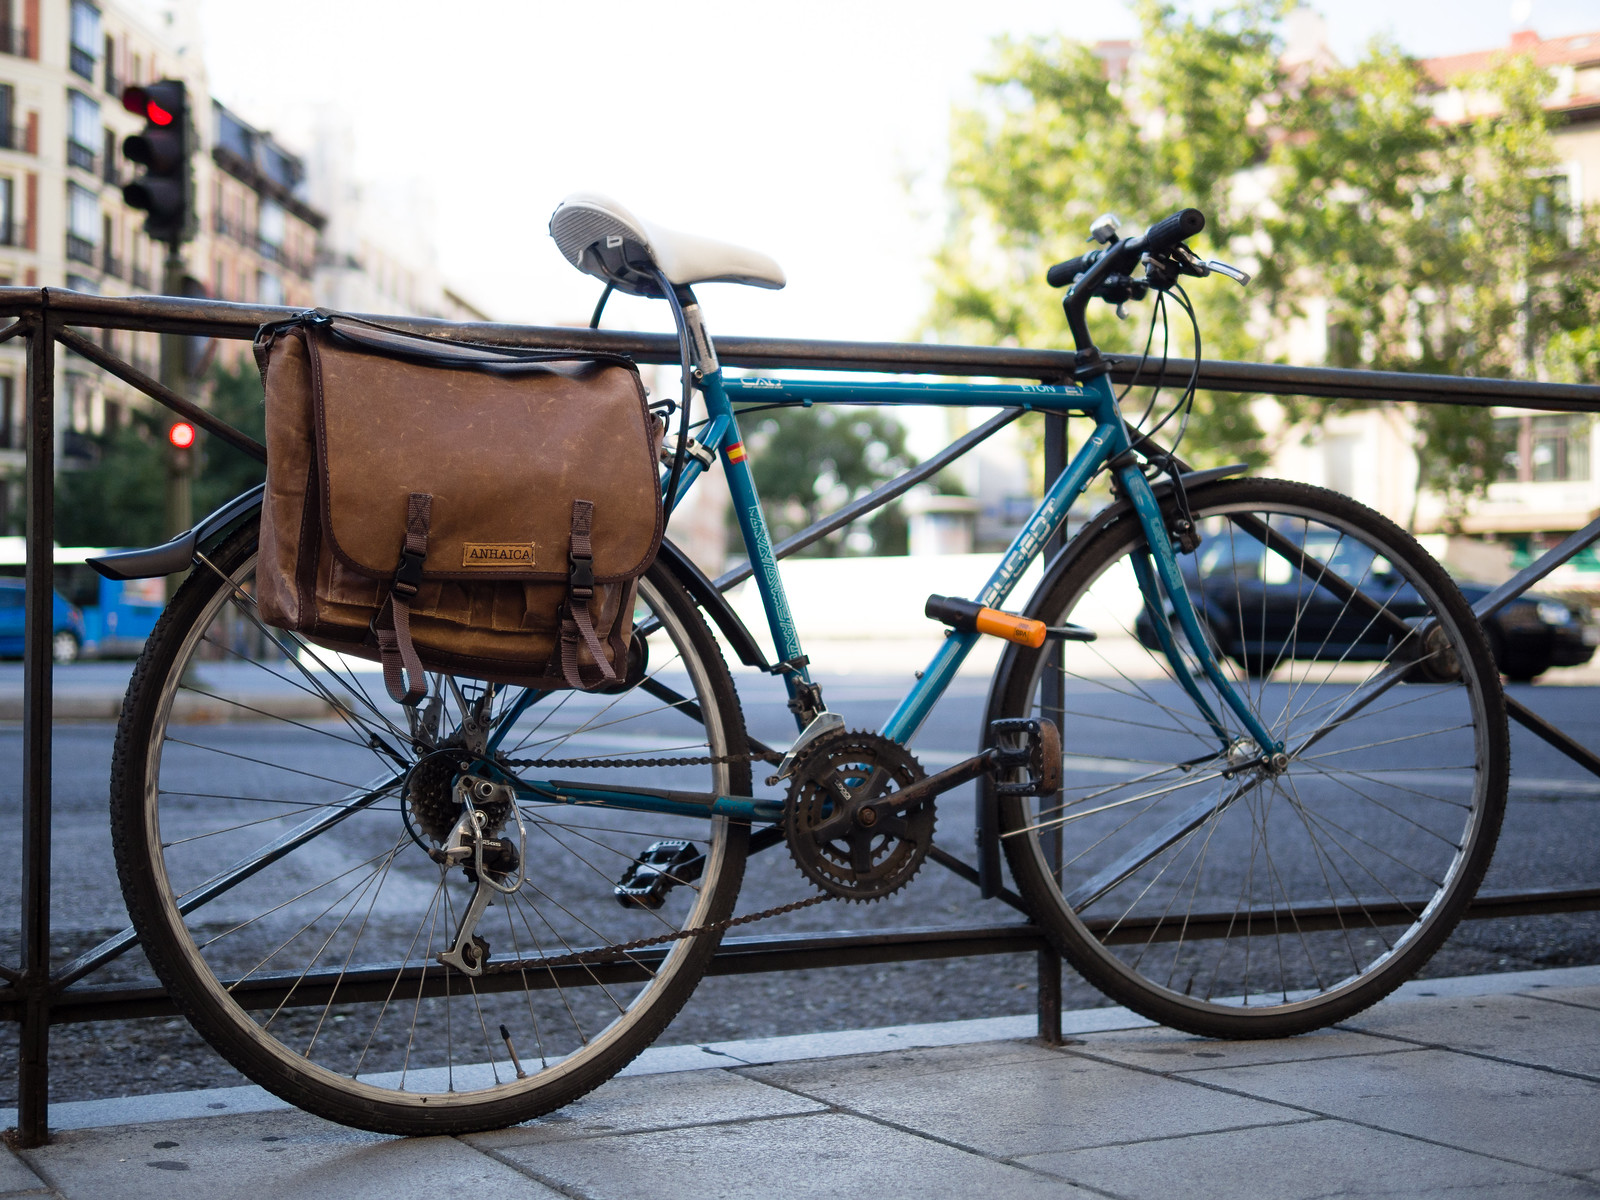
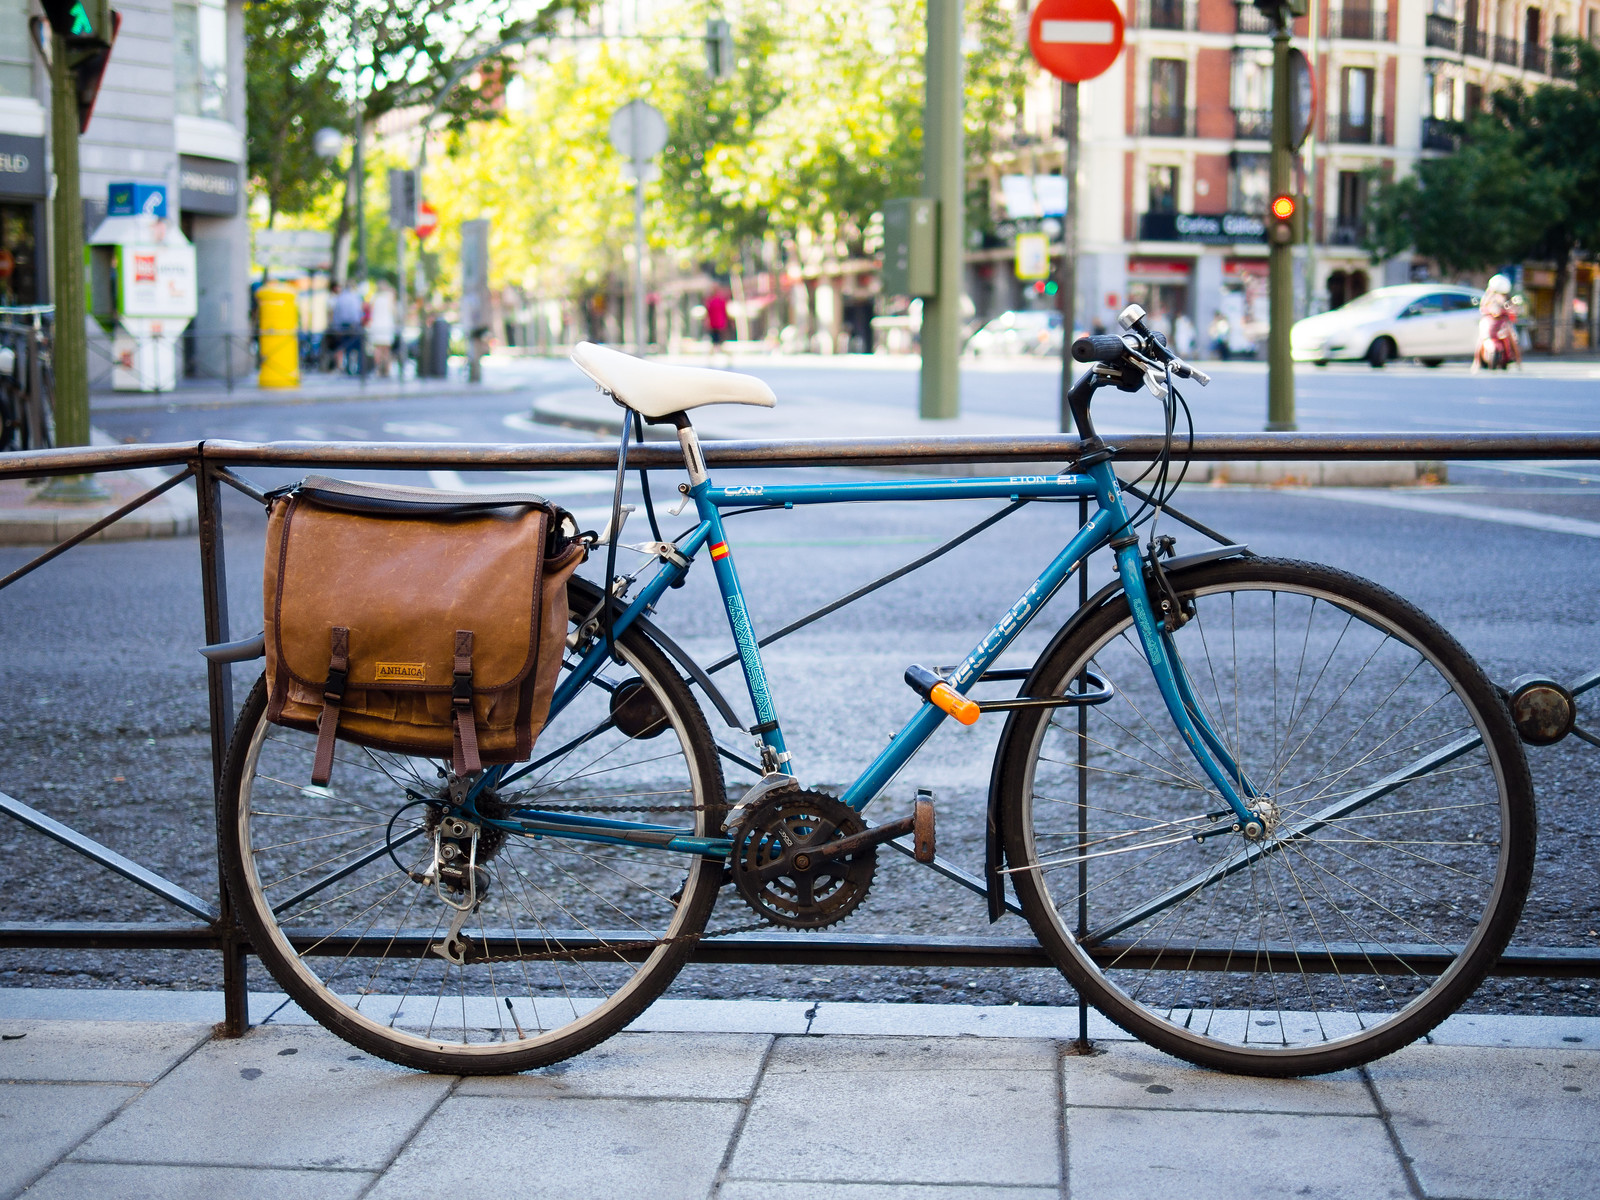
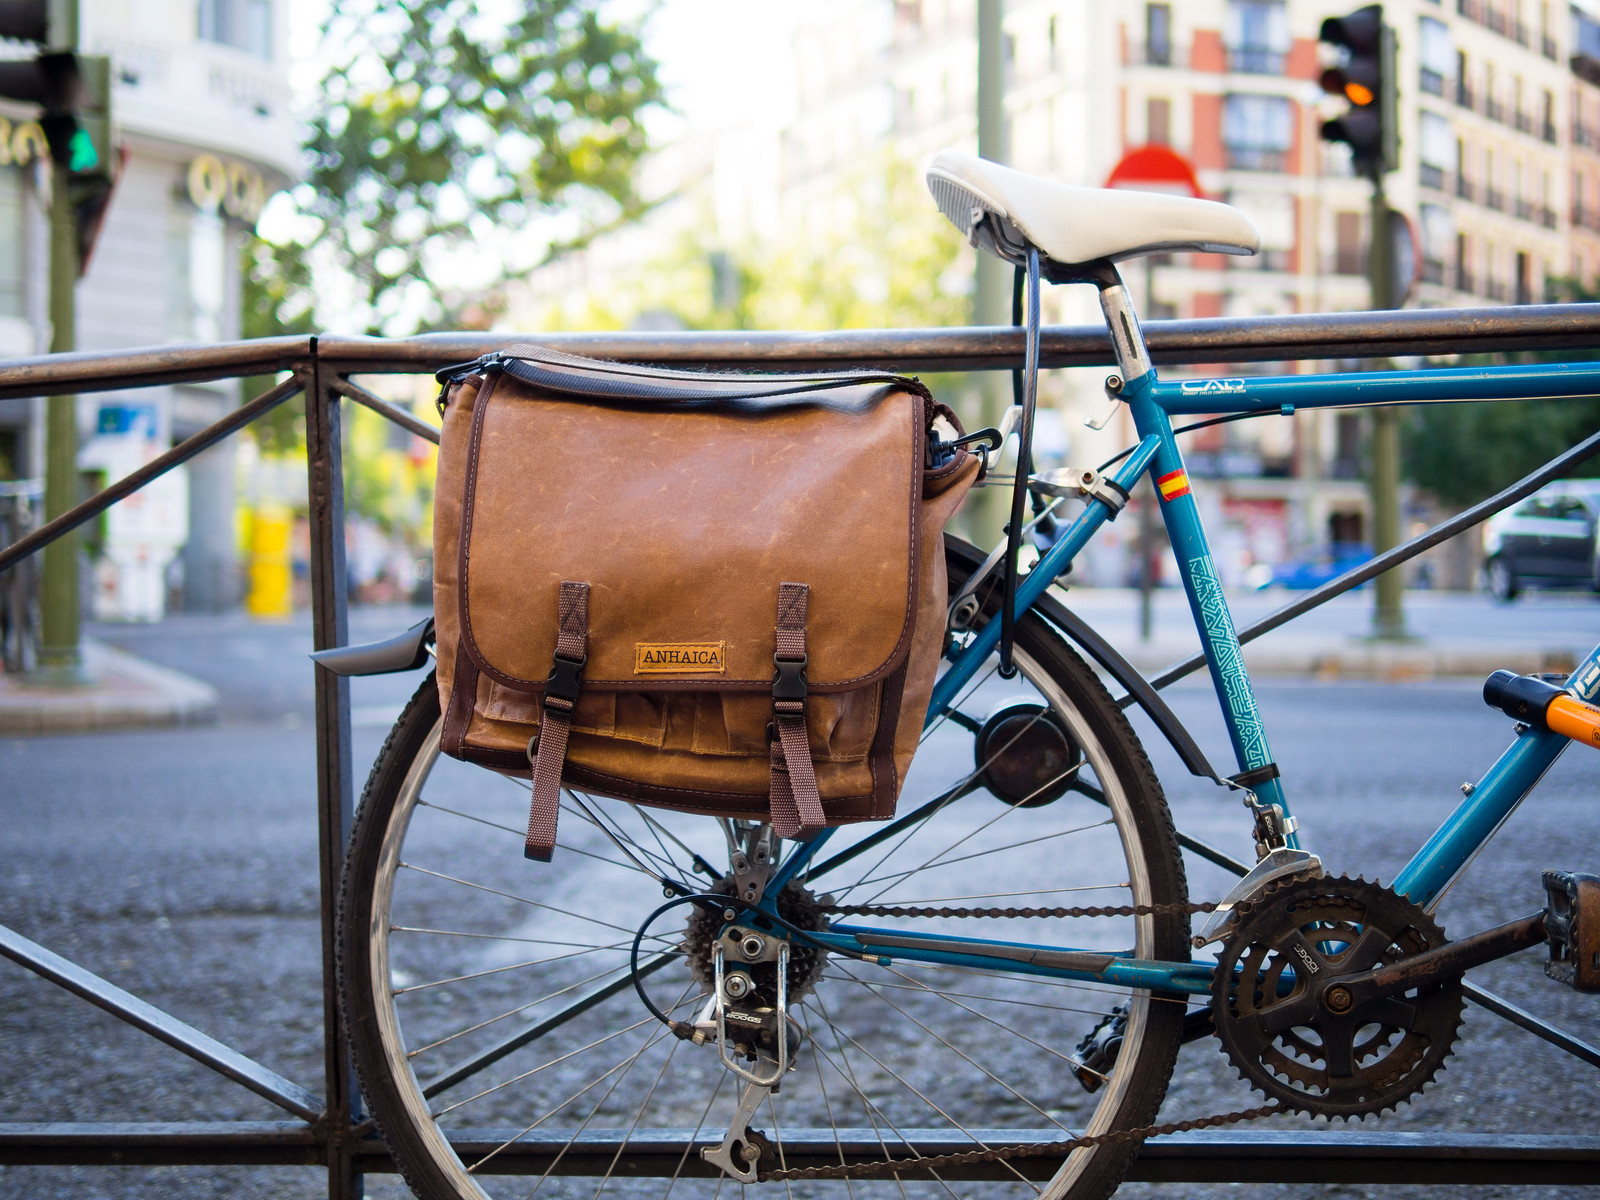
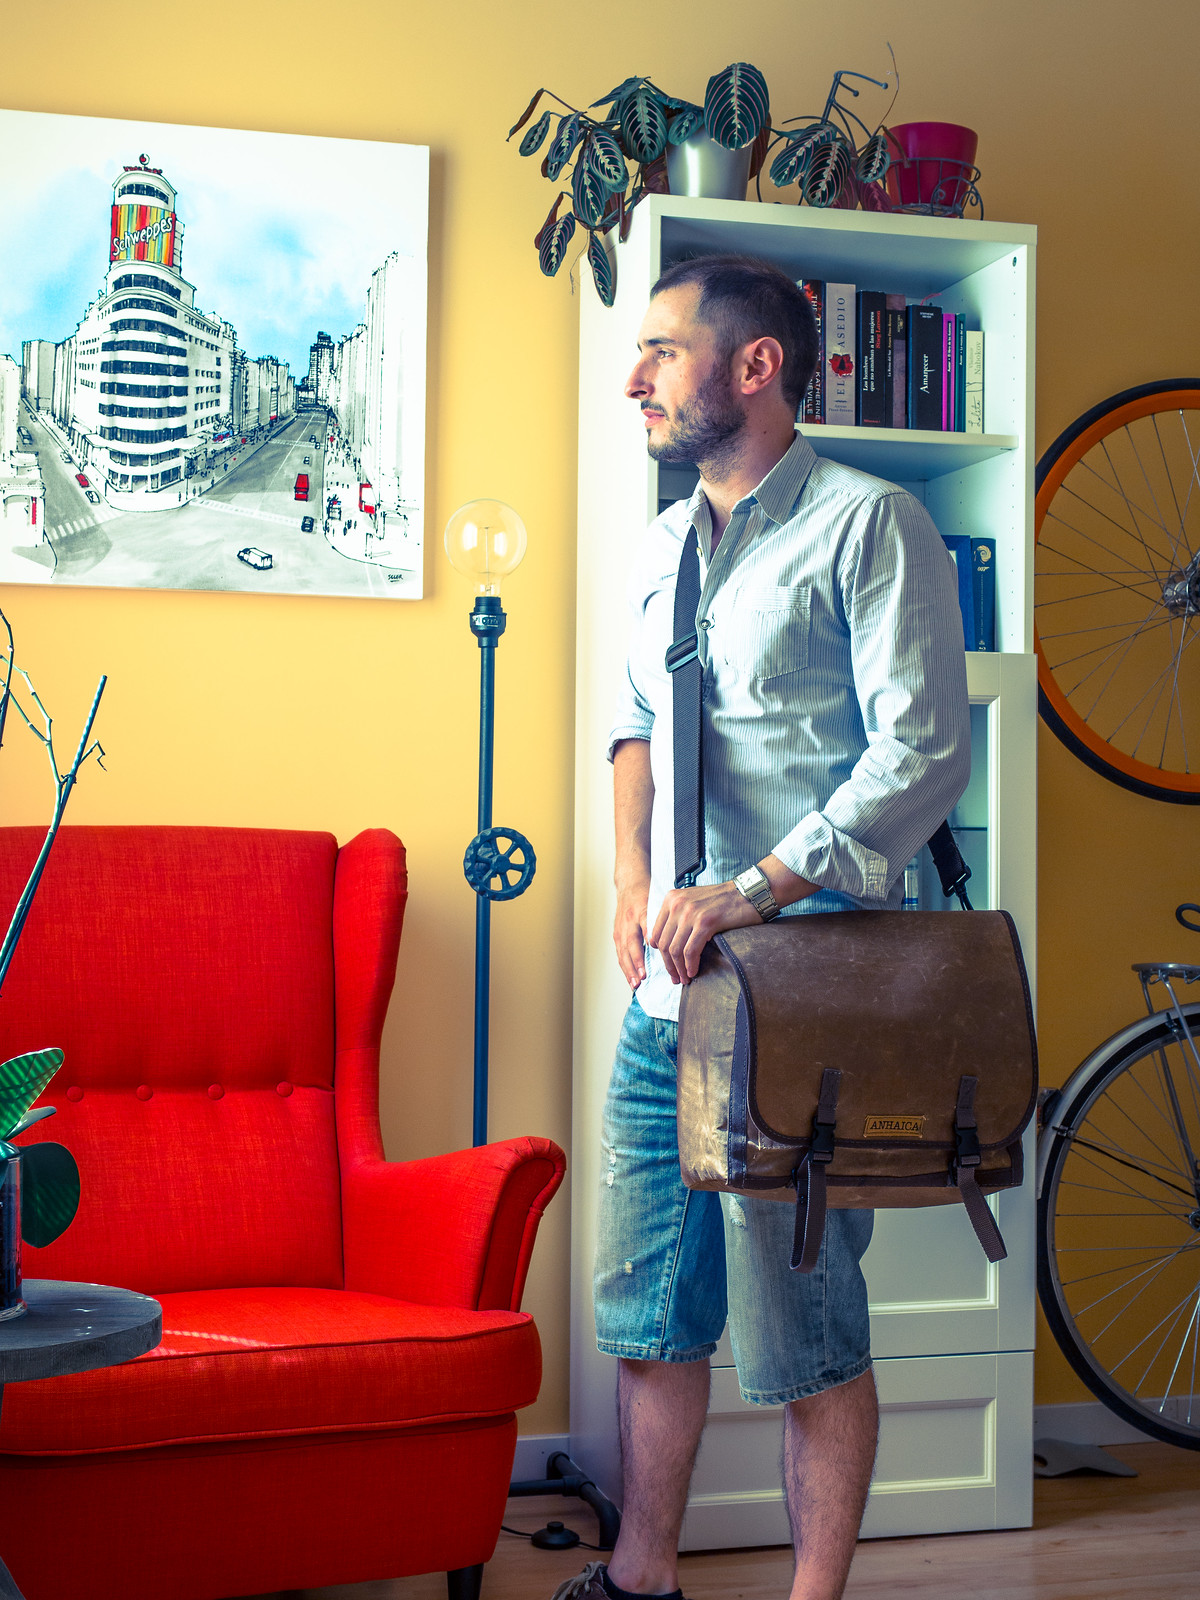
The bag I chose is a custom-made, waxed-canvas messenger bag and pannier by Anhaica Bag Works. I usually move around the city on my bicycle, so I needed a bag that I could clip onto the rack of my bike and use as a pannier. This way I can relieve my back of the weight, which makes it much easier to carry on the bike and has the added benefit of keeping me dry, especially my back. If you’ve ever carried a backpack on your bike on a hot summer day, you know what I mean.
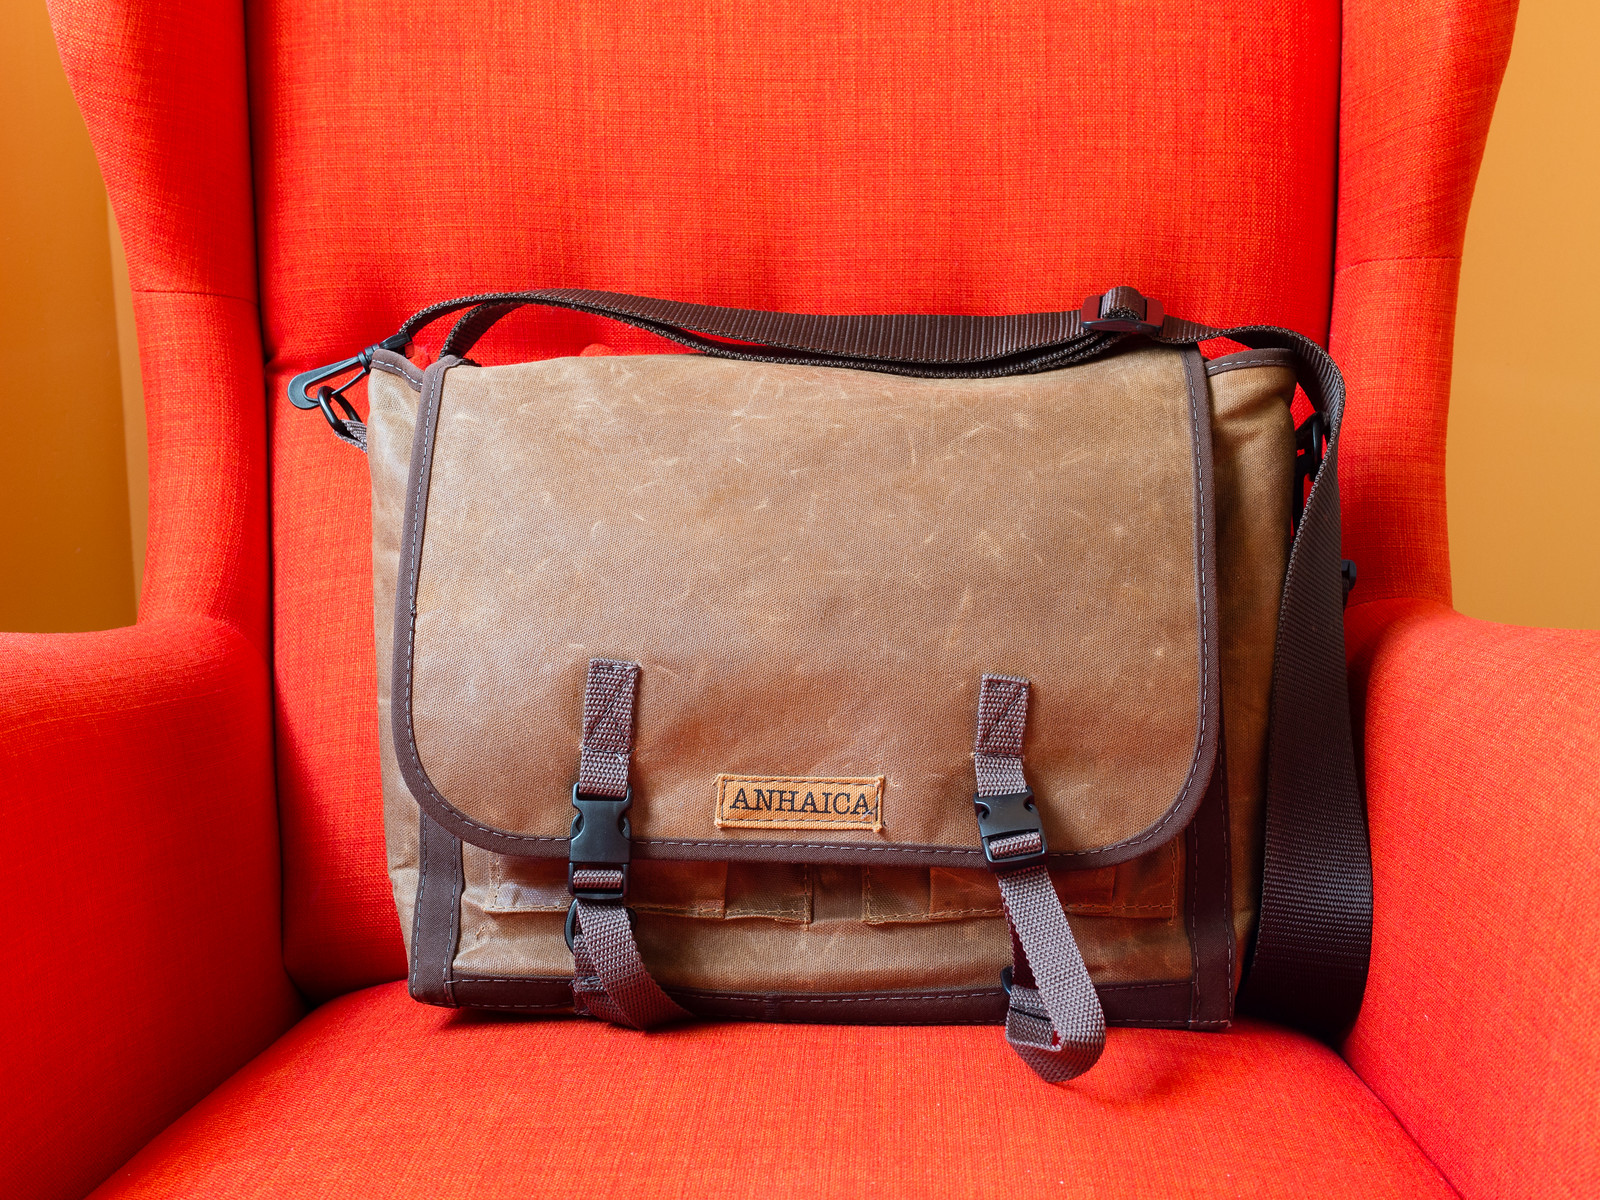
The messenger pannier comes in a variety of colors, but I like the standard brown. Since they are made-to-order, you can request a wide range of customizations to be made, including size, color, etc.

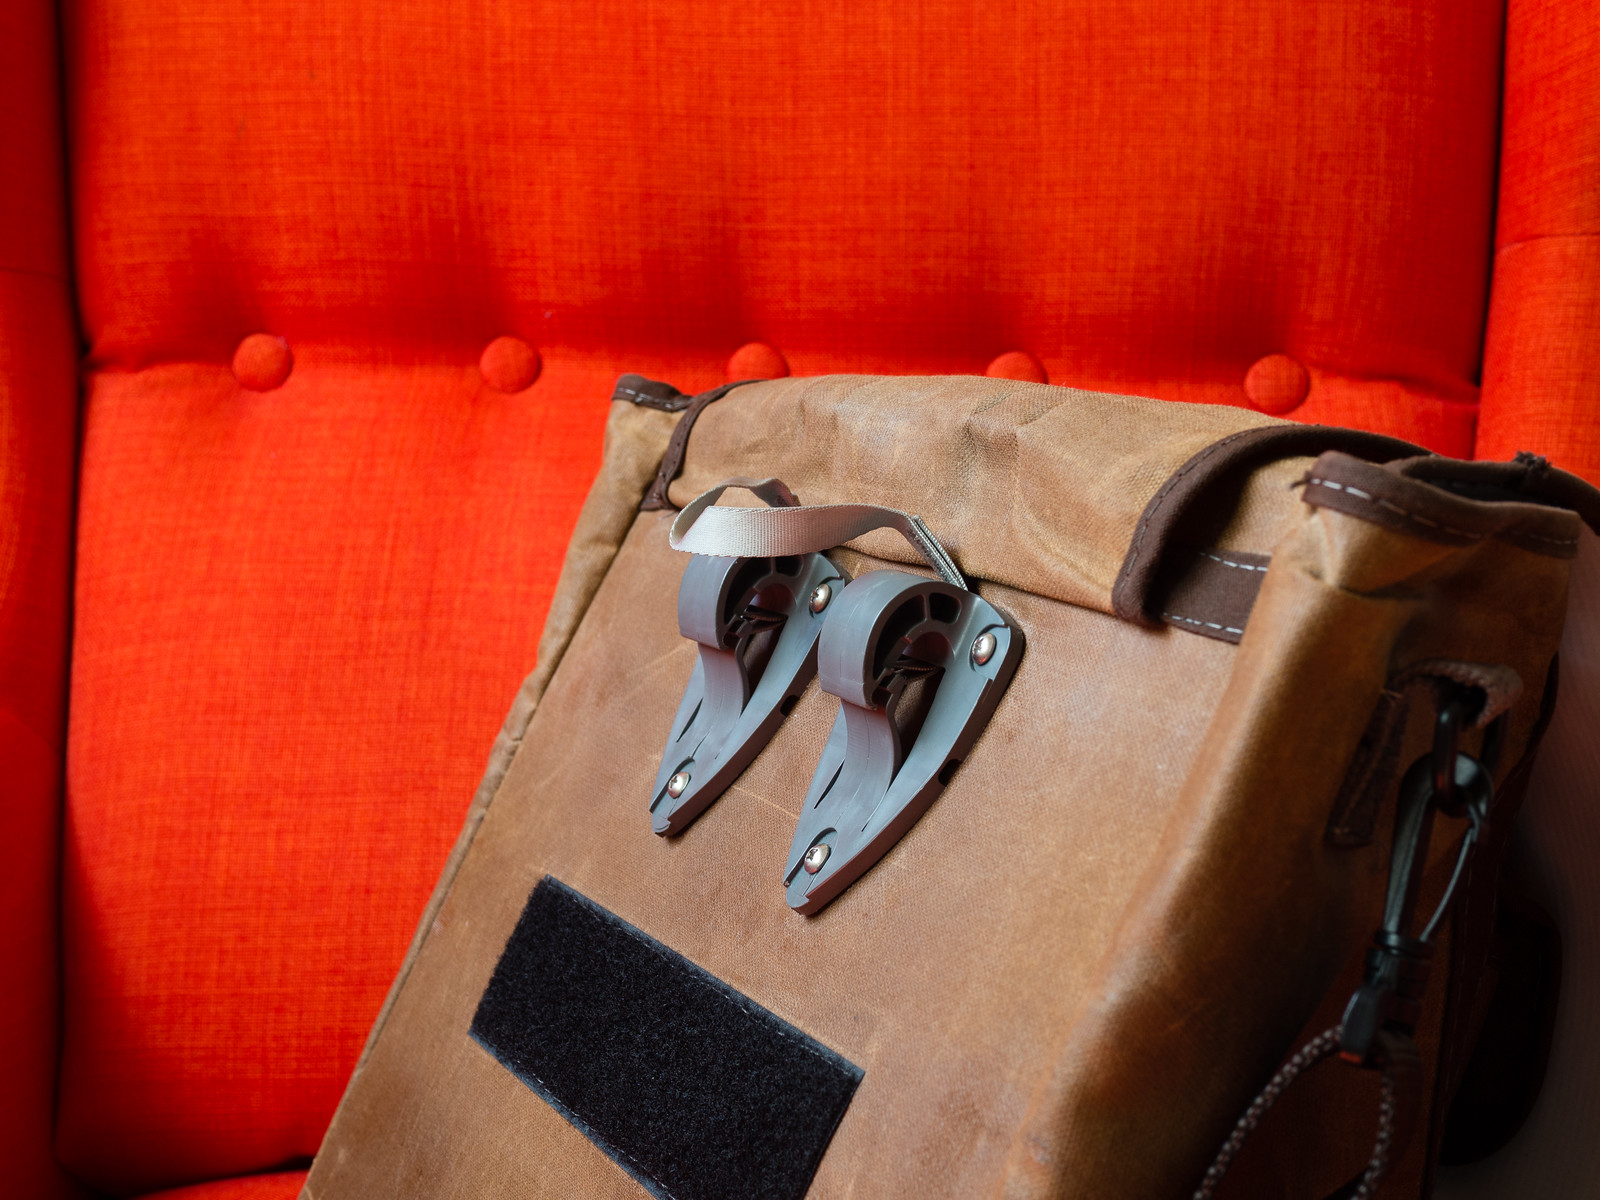
The back of the bag has a flap cover that hides the bike rack clips when they’re not needed. It’s a nice little design touch that makes the bag more comfortable to carry over your shoulders. You can just pull the cover and clip the pannier onto your bike rack, as you would any other pannier.
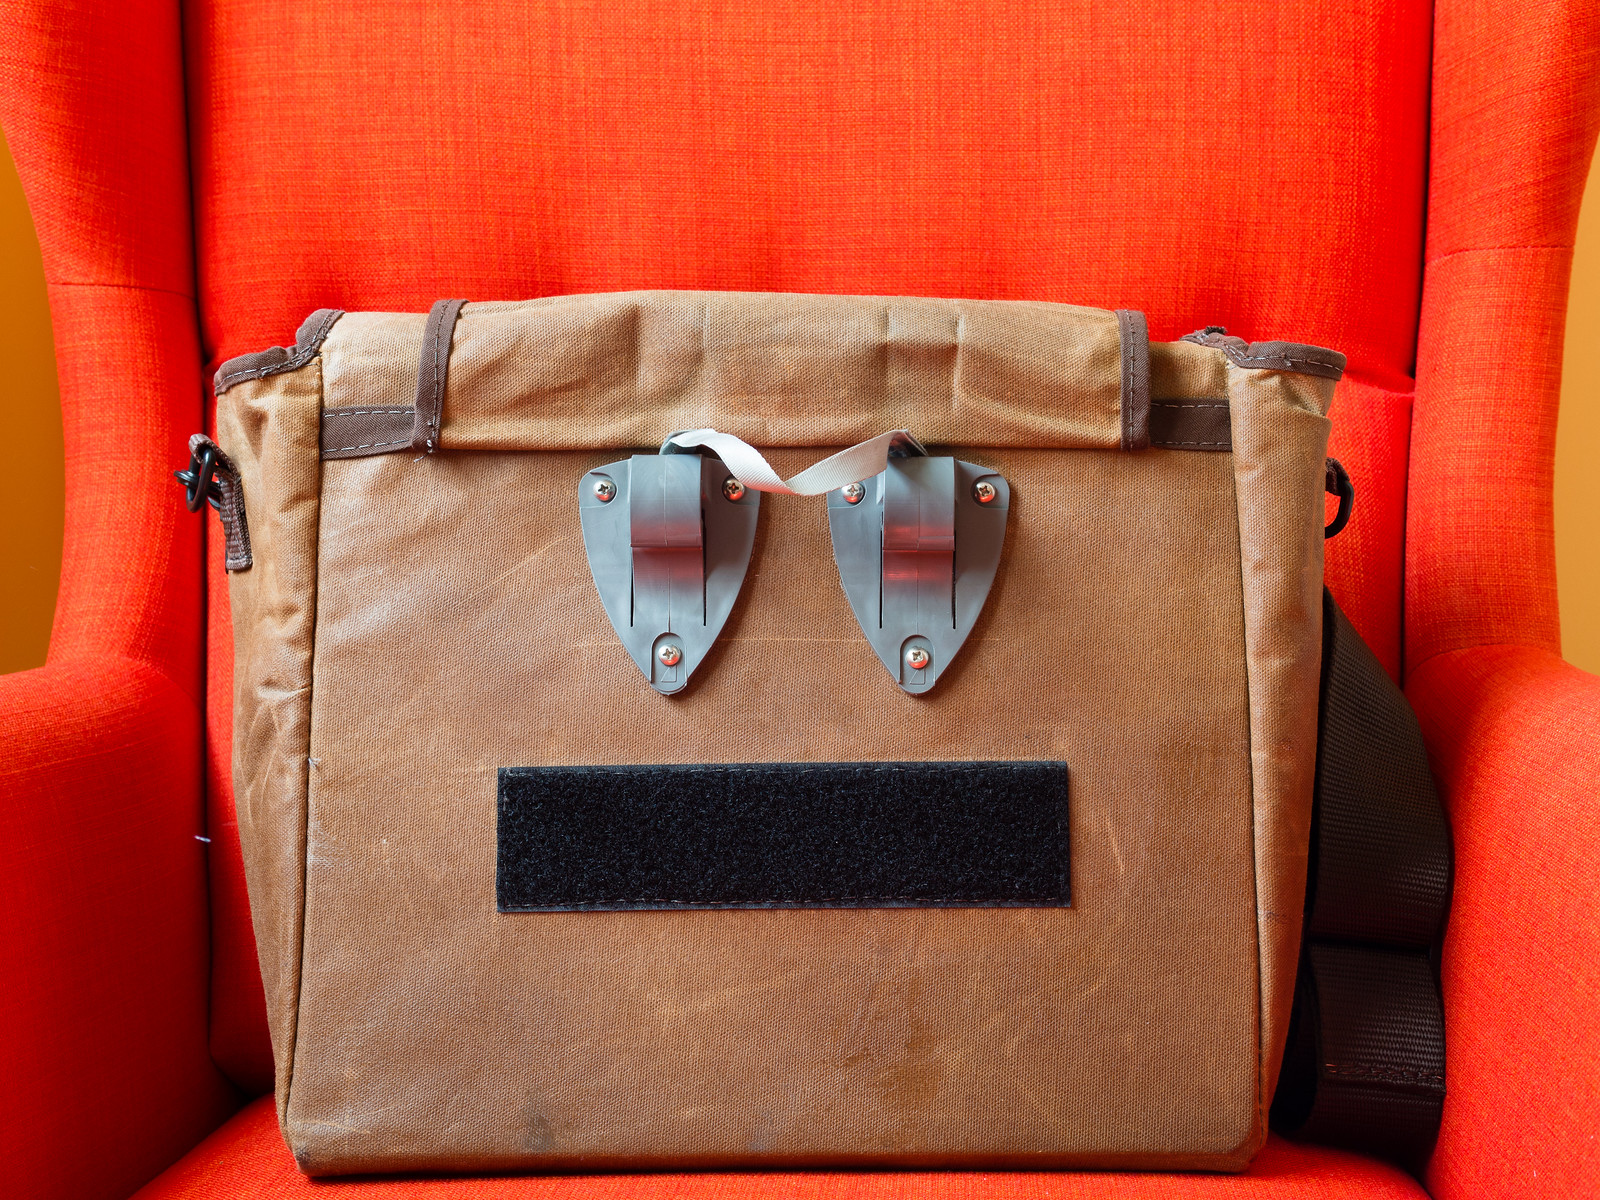
The last thing you need when you’re cycling through town is to keep worrying about your bag falling off your bike. Fortunately, all Anhaica bags use MEC clips, which are easy to clip on and off the bike and make the bag stay firmly in place. Plus, they’re durable: I have used them for over a year, and I am yet to see any wear signs from them.
Besides the main compartment, the bag has a sleeve compartment in the front, as well as two secondary pockets. Having these extra options makes it easy to keep all your stuff organized.
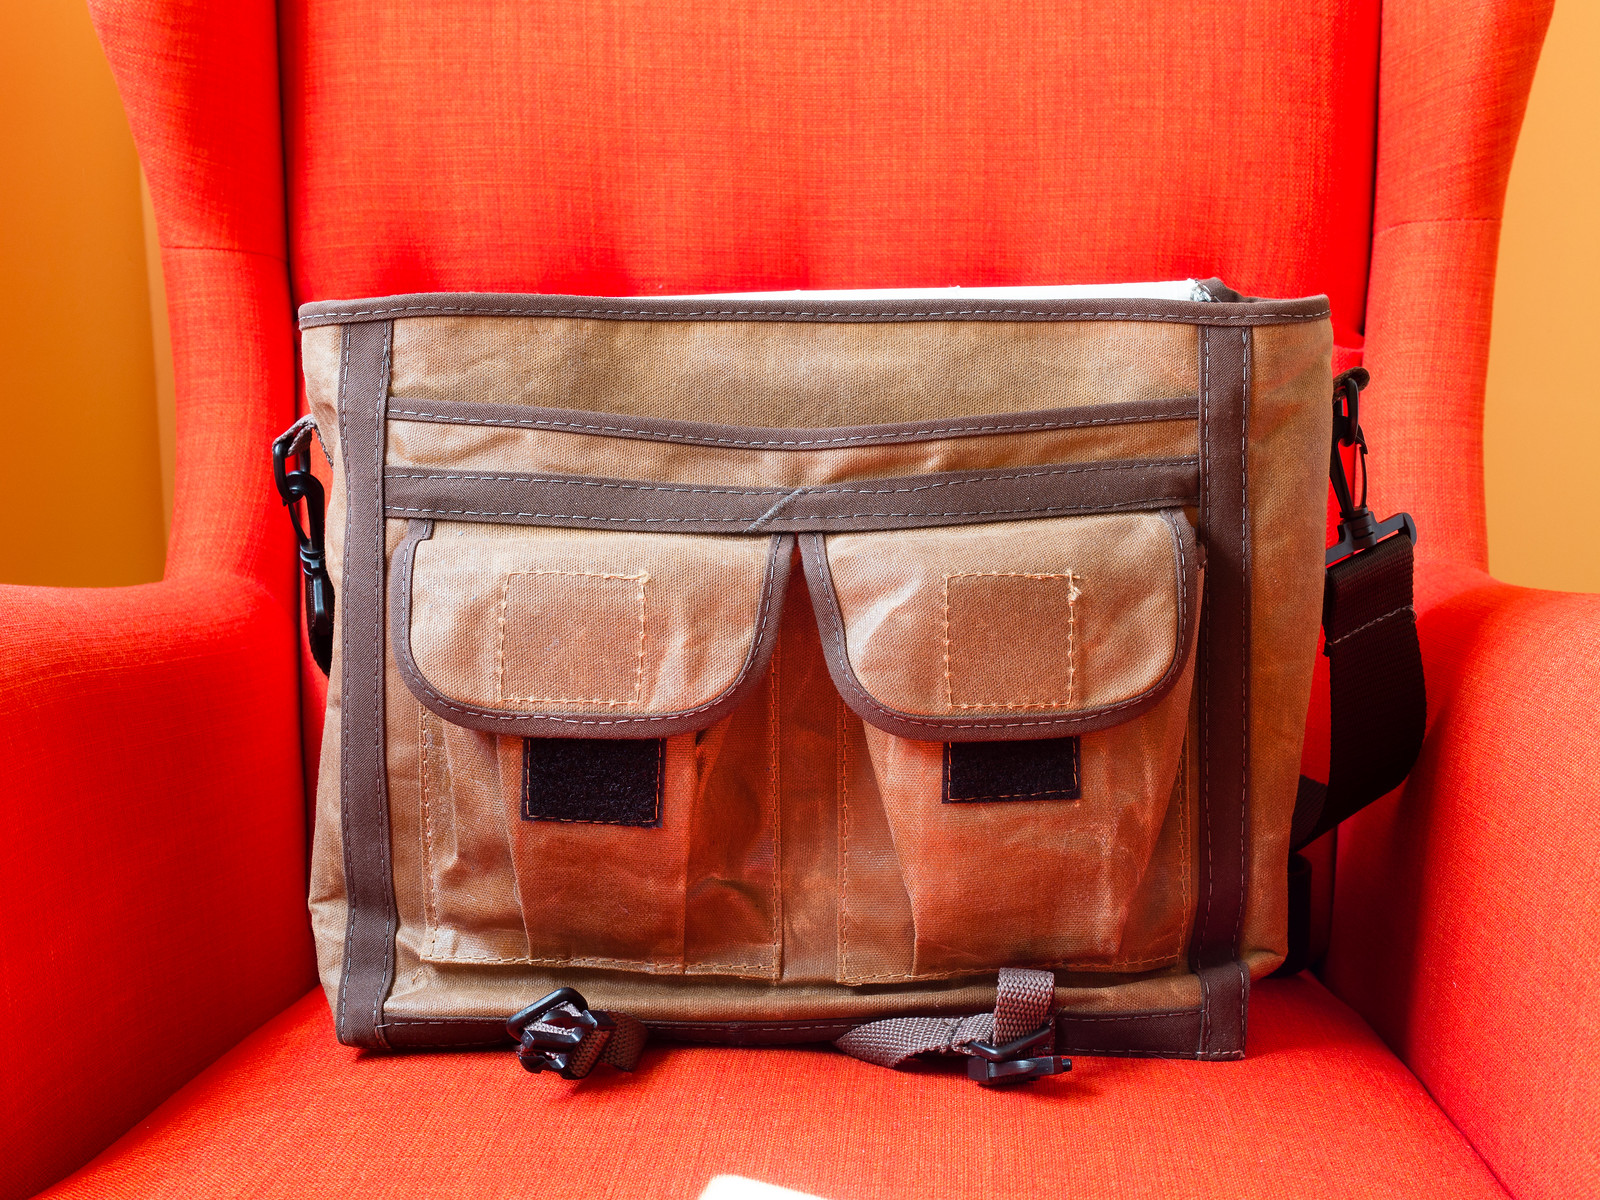
All in all, this is a really nice bag but, alas, it’s not perfect: since it has a flap cover, it will not keep your stuff safe from the rain, as water will leak through the sides. Luckily, we don’t get much rain in Madrid these days, and I can use it throughout most of the summer season without any problems. However, if you live in a rainy area I wouldn’t recommend it. Don’t worry though, any similarly sized messenger bag will work great. Personally, during the rainy season I prefer to use a backpack anyway, since by then it’s usually a bit cooler and sweat is not so much of a problem. The GORUCK GR Echo, for example, is a great choice and it’s what I use. But more on that later.
Like I said before, I believe limiting the amount of gear that you take with you can be an effective way to boost your creativity. However, you should still be careful and make sure you pack everything you’ll need. I like to carry my camera and at most two lenses, one for portraits and another for wider shots.
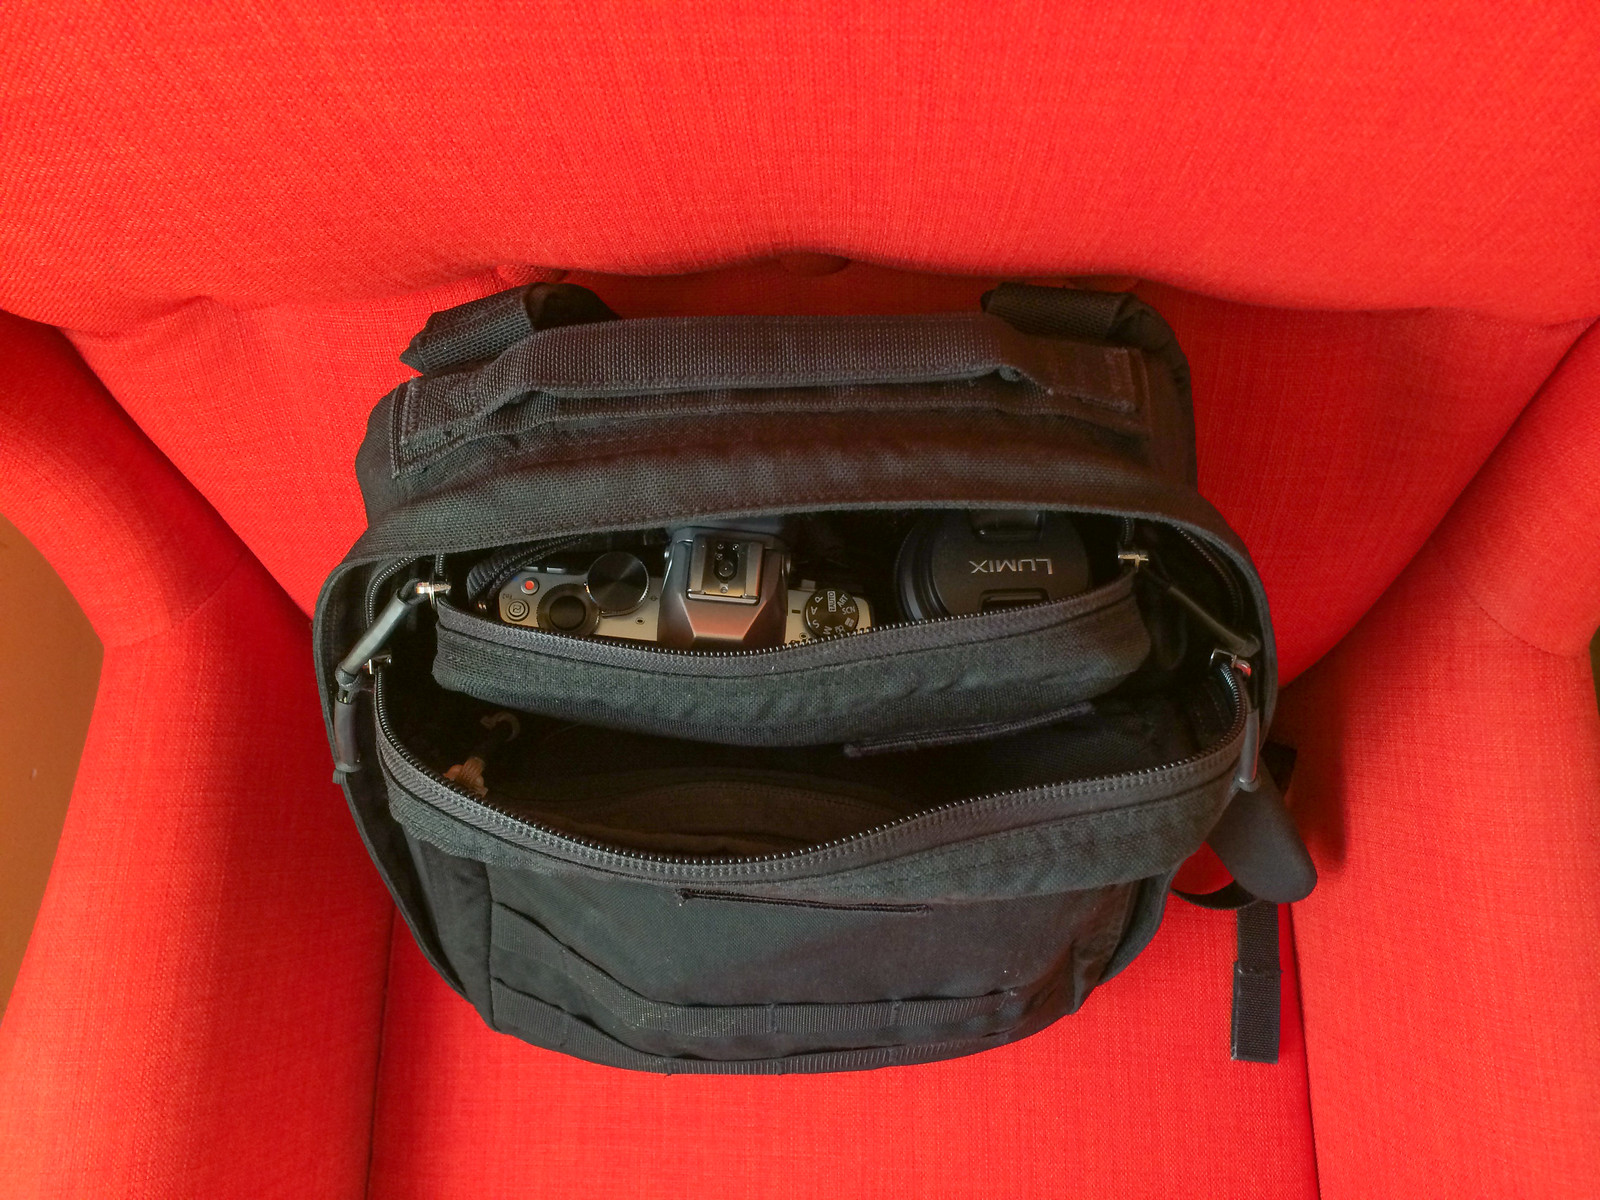
My camera is an Olympus OM-D E-M10,2 which is a mirrorless camera with a Micro Four Thirds sensor. It’s a great little camera, capable of producing extremely high-quality images and with plenty of manual-controls, while being impressively thin and light, even by Micro Four Thirds standards. And at $699 body-only, it’s quite affordable, too. If money is no objection to you, then the flagship Olympus OM-D E-M1 is certainly better in some areas, but if you care about getting the most bang for your buck, the E-M10 is a solid choice. You get the same IQ as the E-M1 and many of the same features for about half the price. Here’s Steve Huff’s review from a few months ago if you want to read further. He certainly seems to like it, and so do I.
My choice of lenses depends on the situation, of course. I currently own the kit zoom and three wonderful fast primes, and I usually take one or two of the primes with me.3
The three primes I own are:
These are three wonderful lenses that will give you everything you need, from a moderate wide angle, perfect for street photography and environmental shots, to a short telephoto that is ideal for portraits and close-ups. They’re also fast, so shooting in low light is not a problem with any of them. If you want versatility while staying light, it doesn’t get much better than this.4
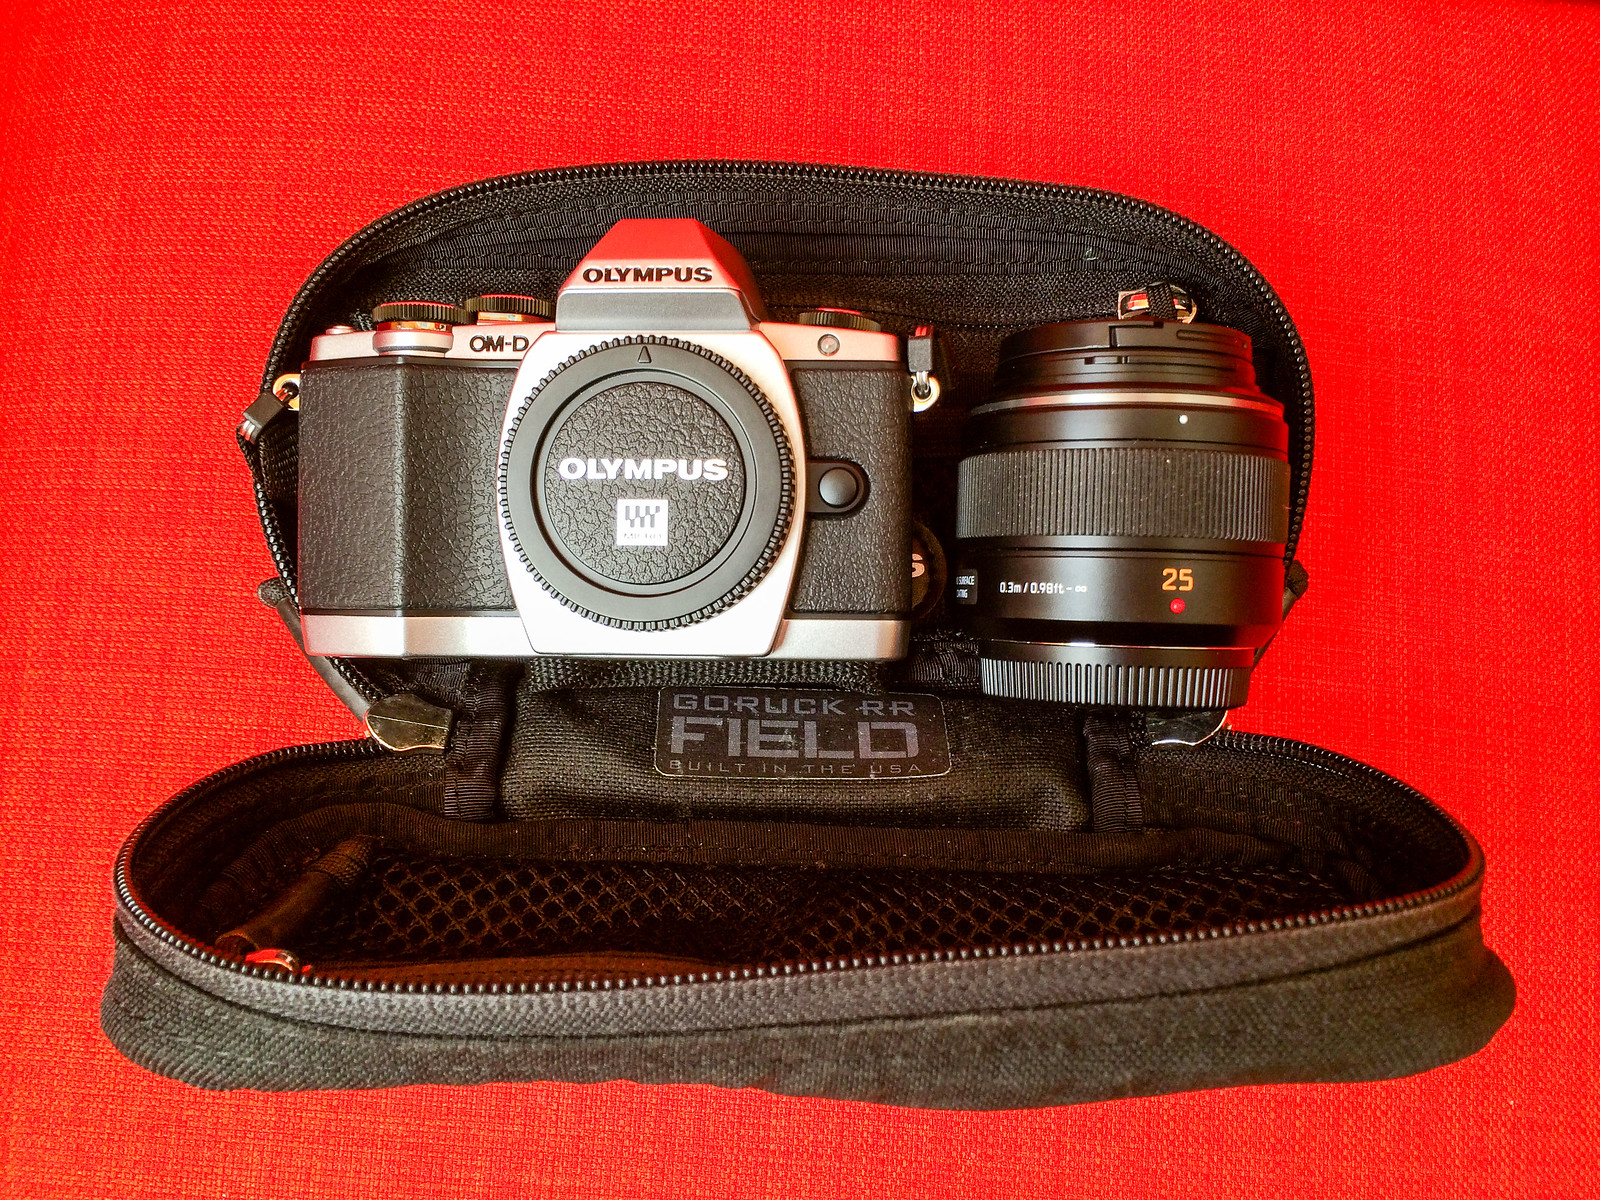
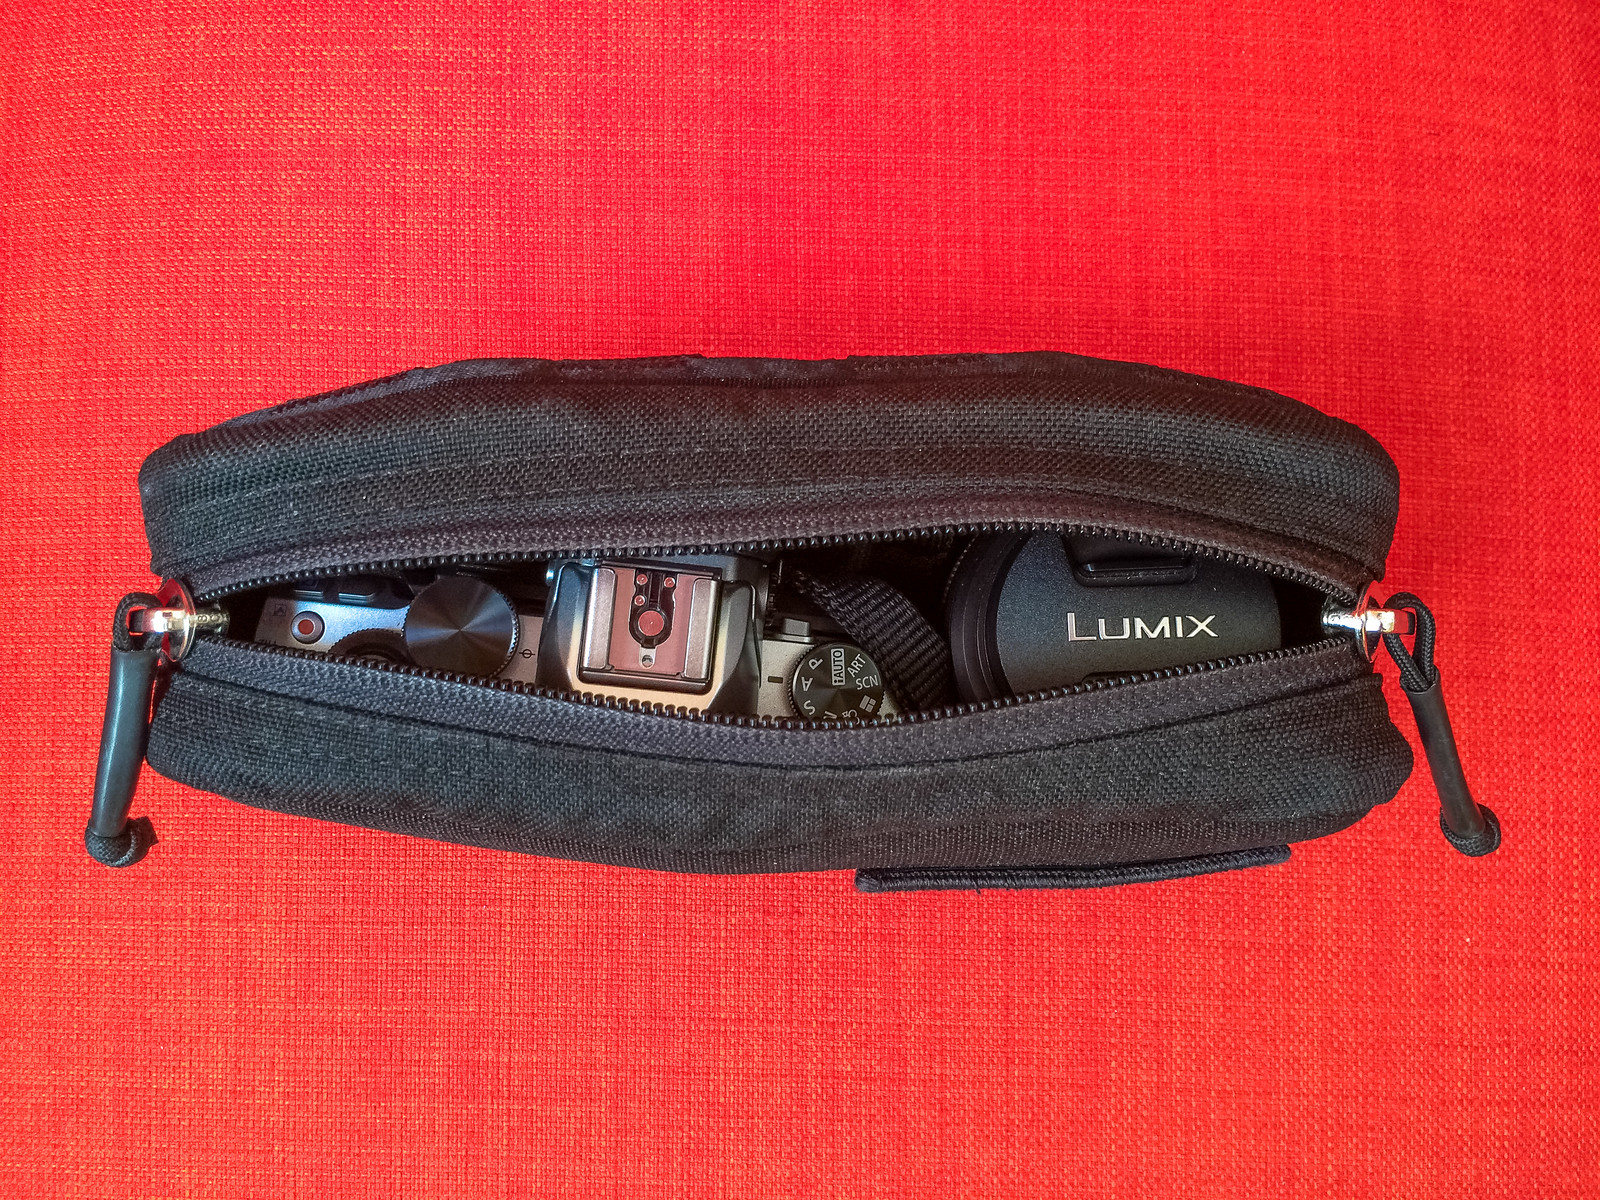
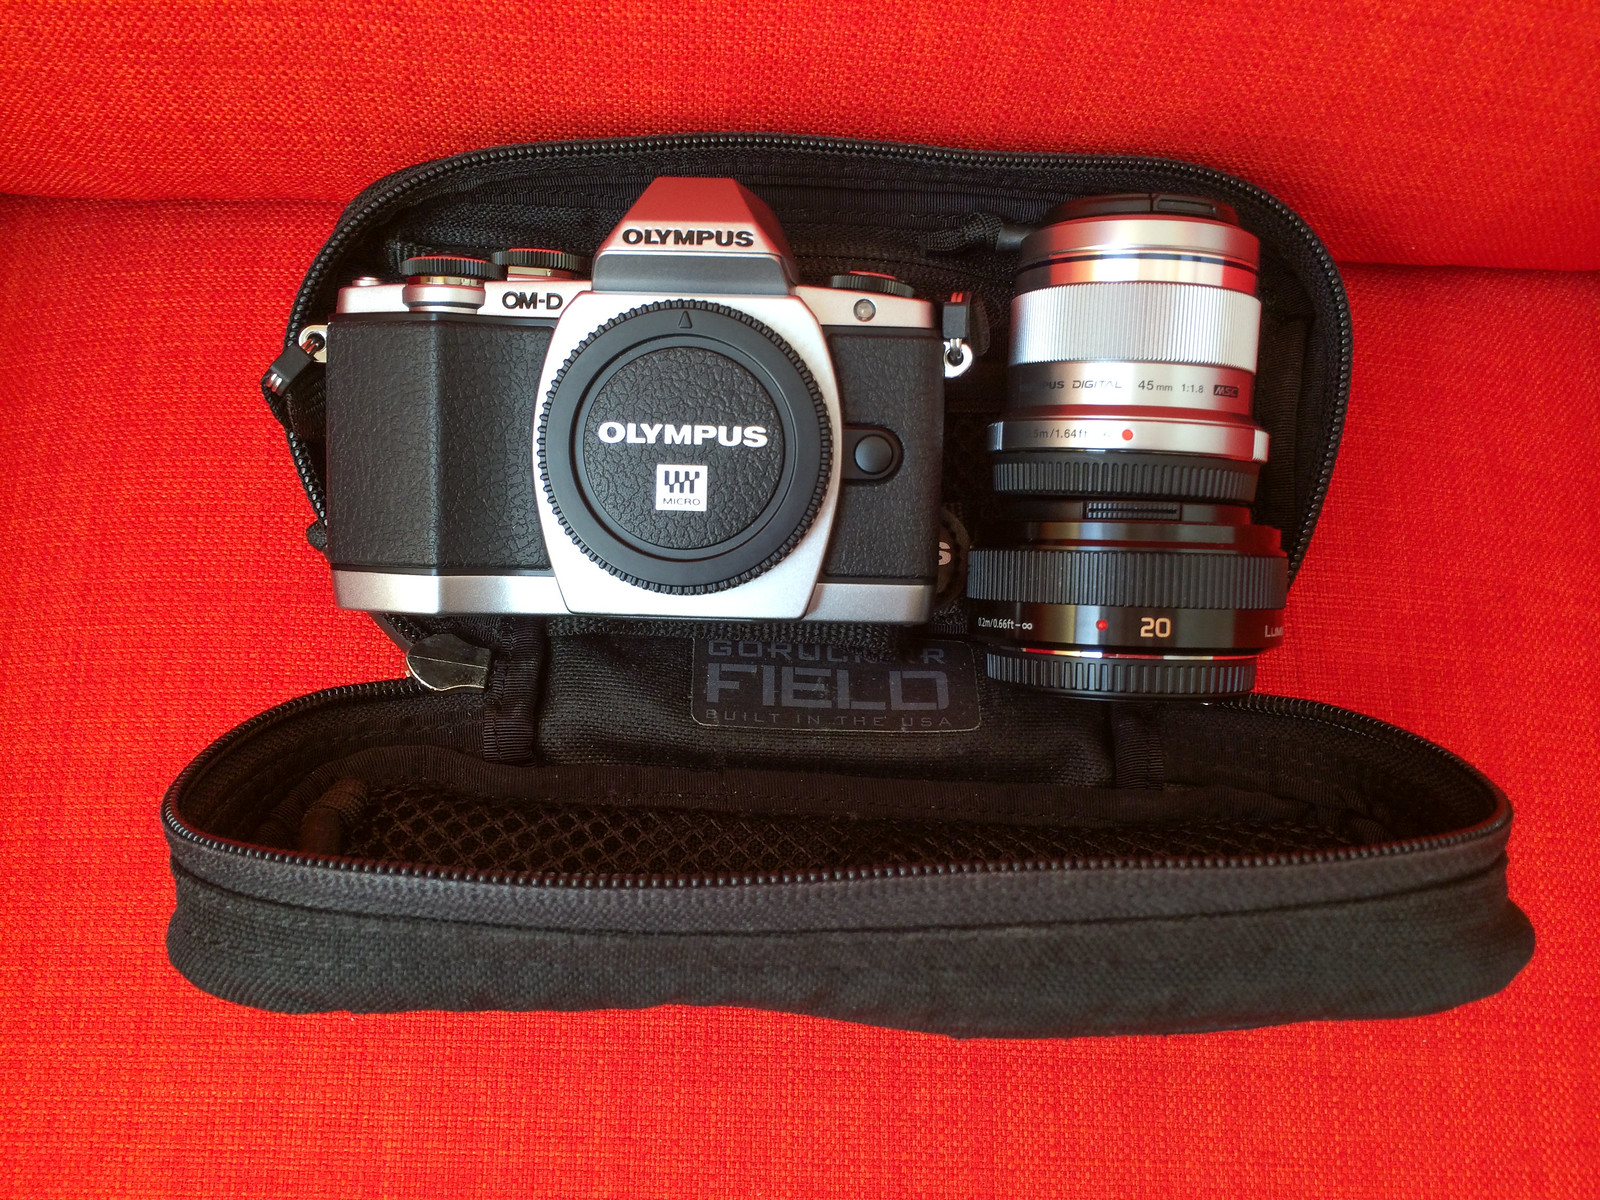
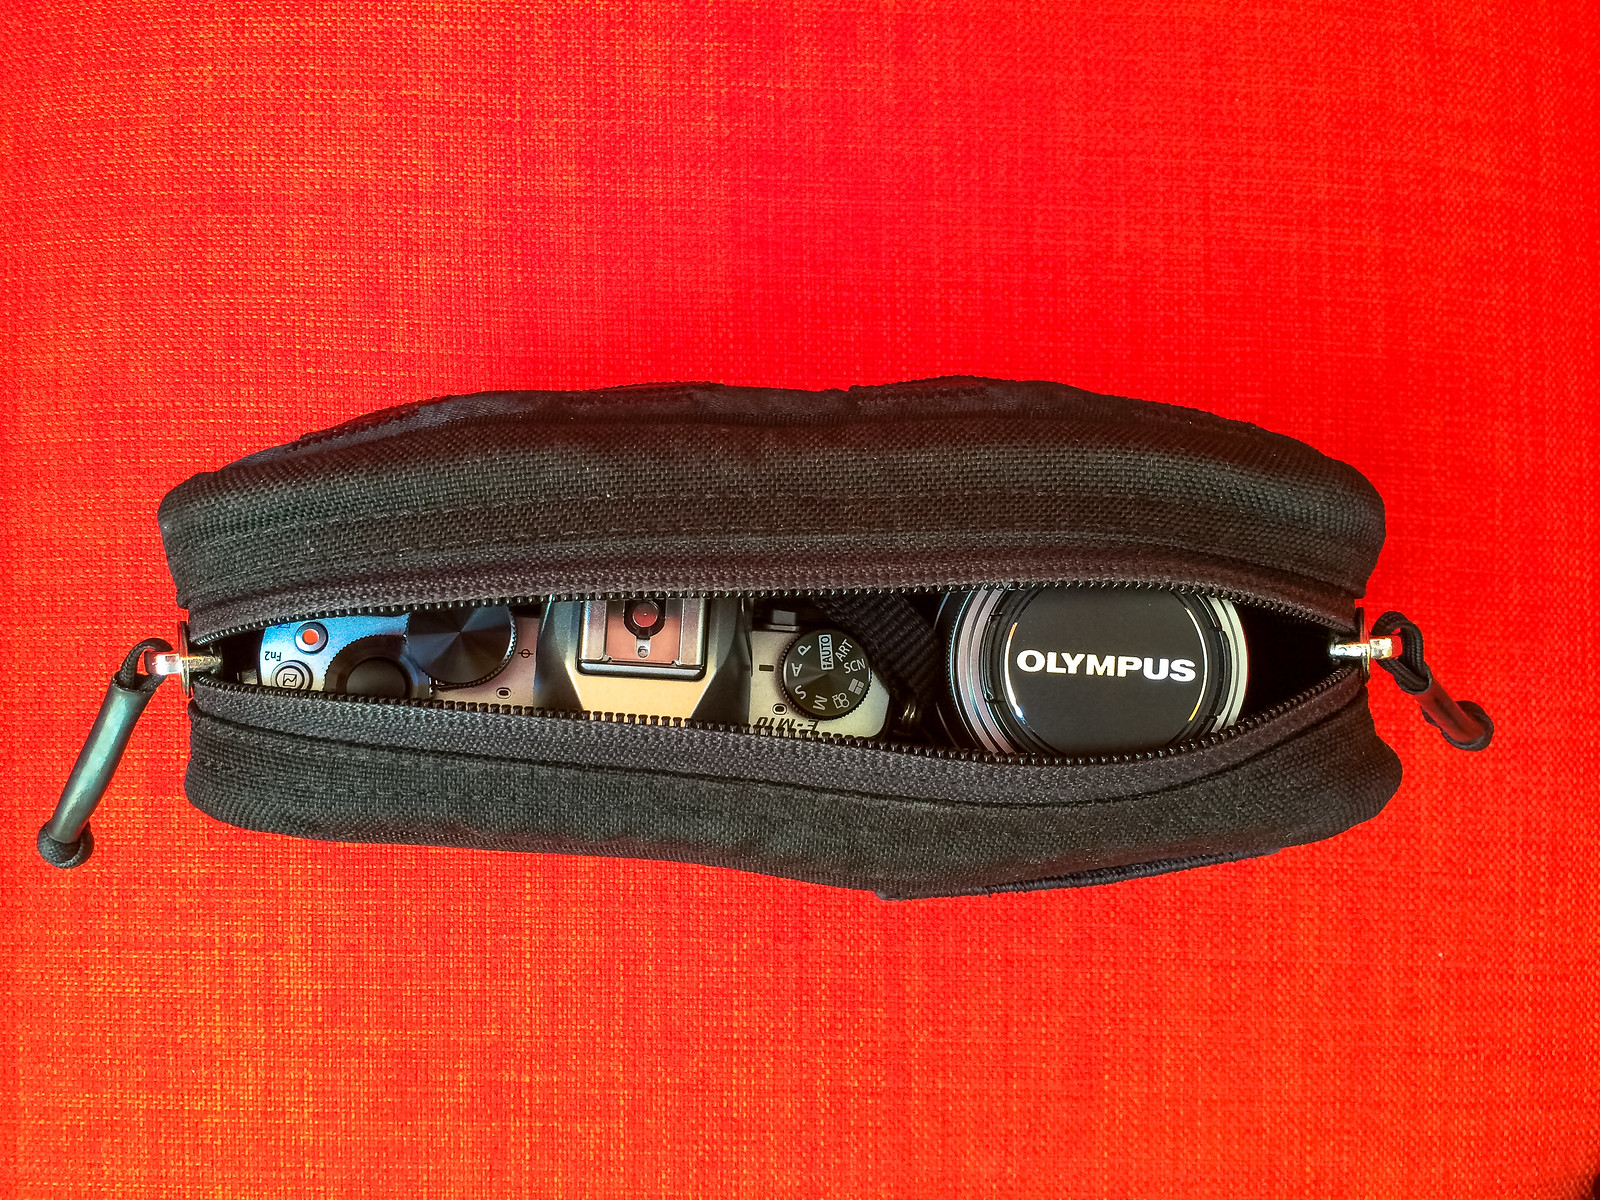
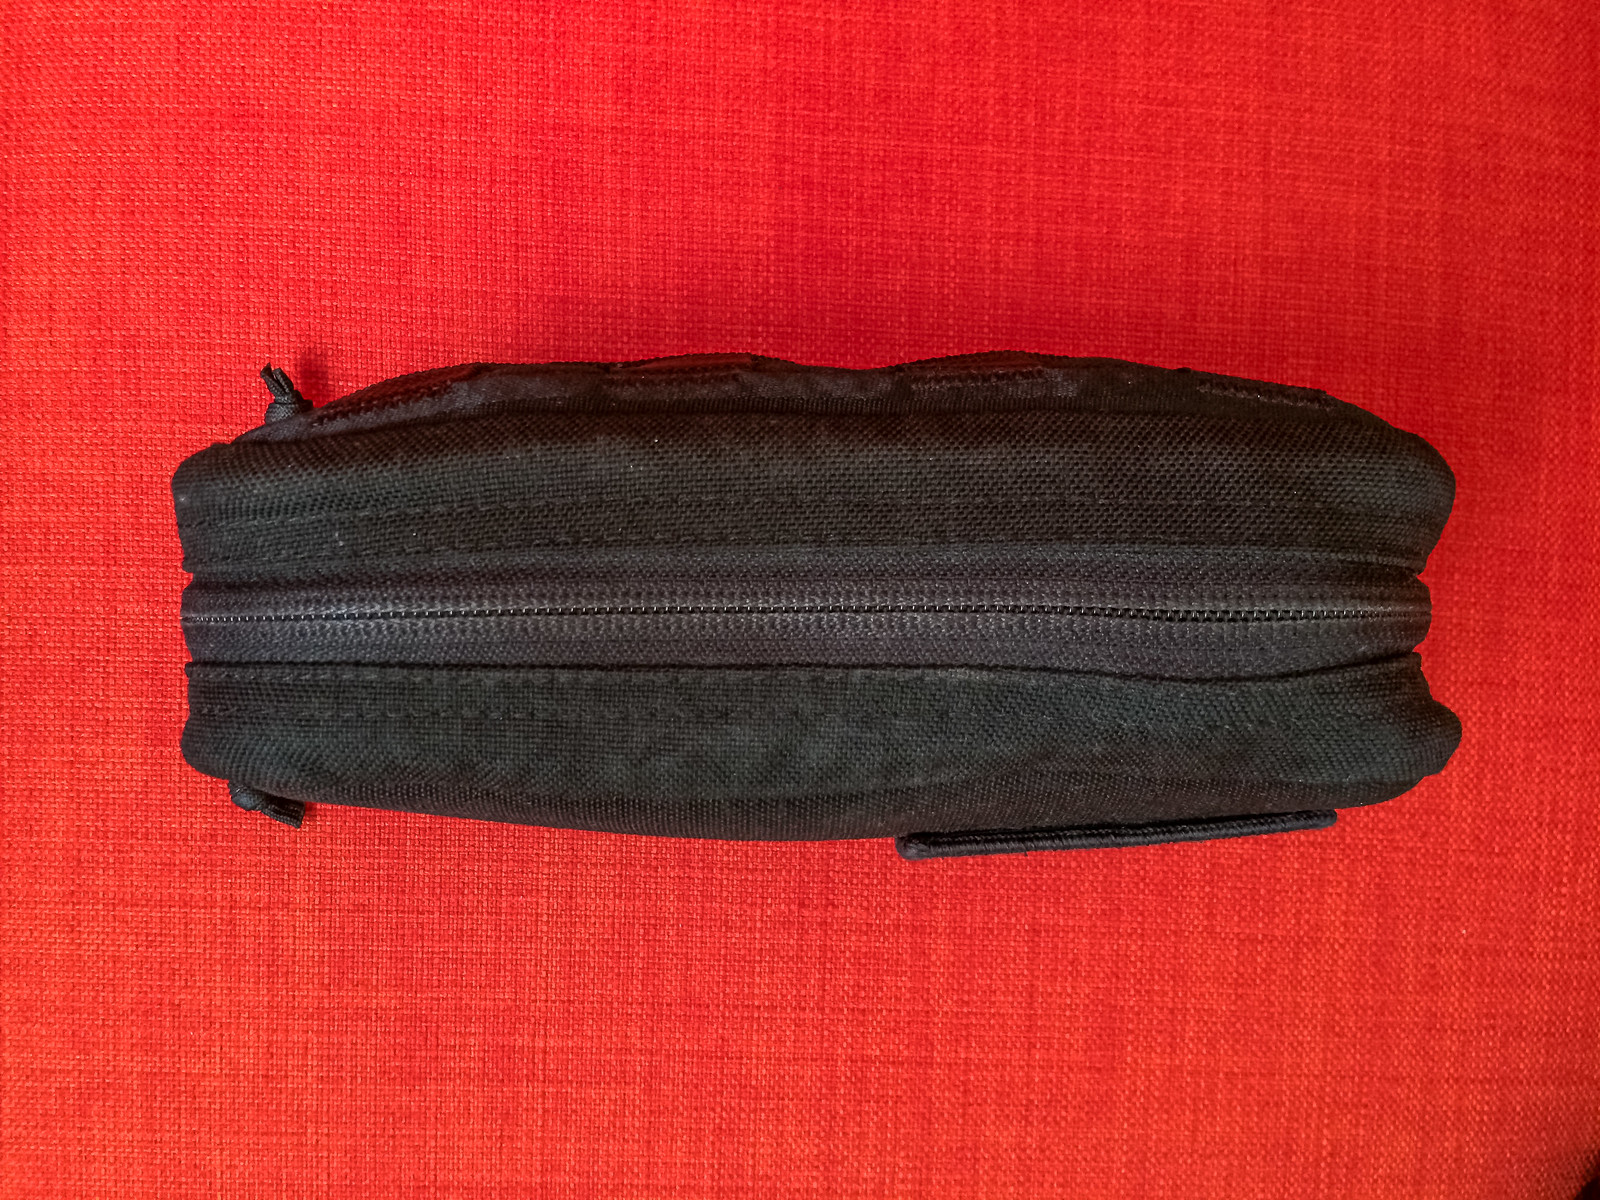
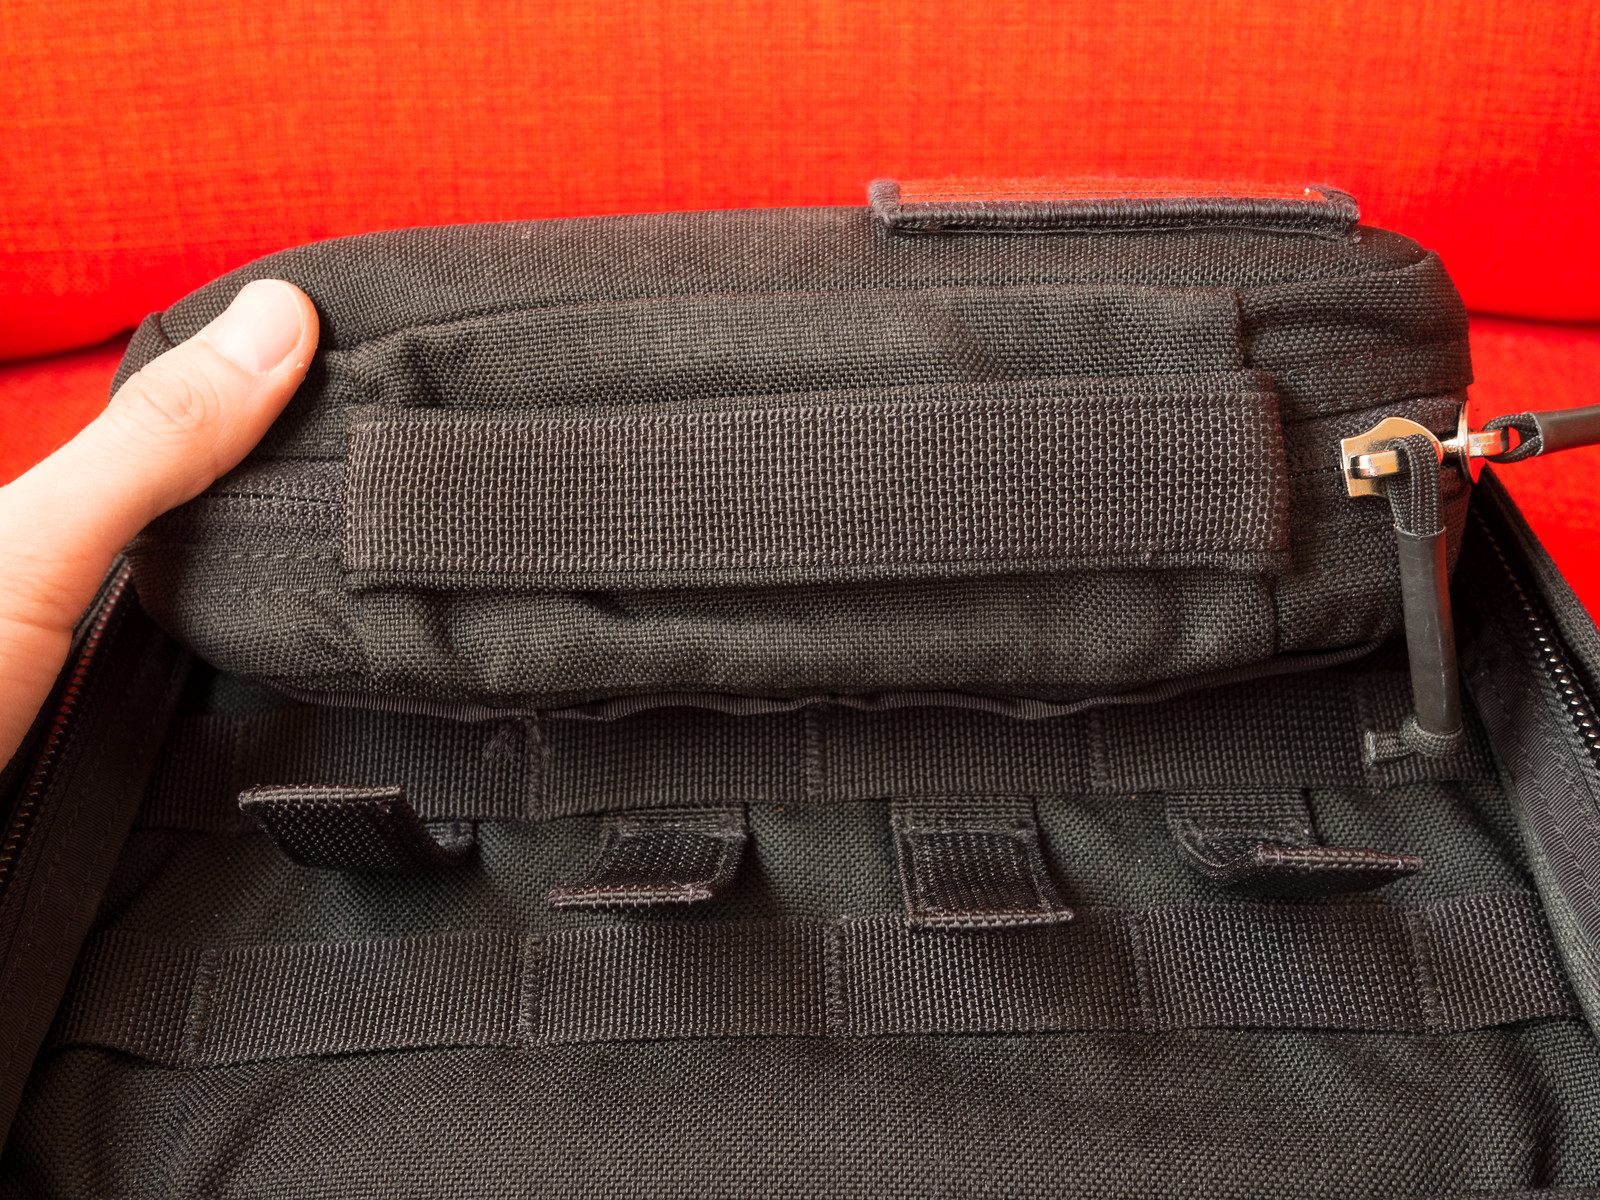
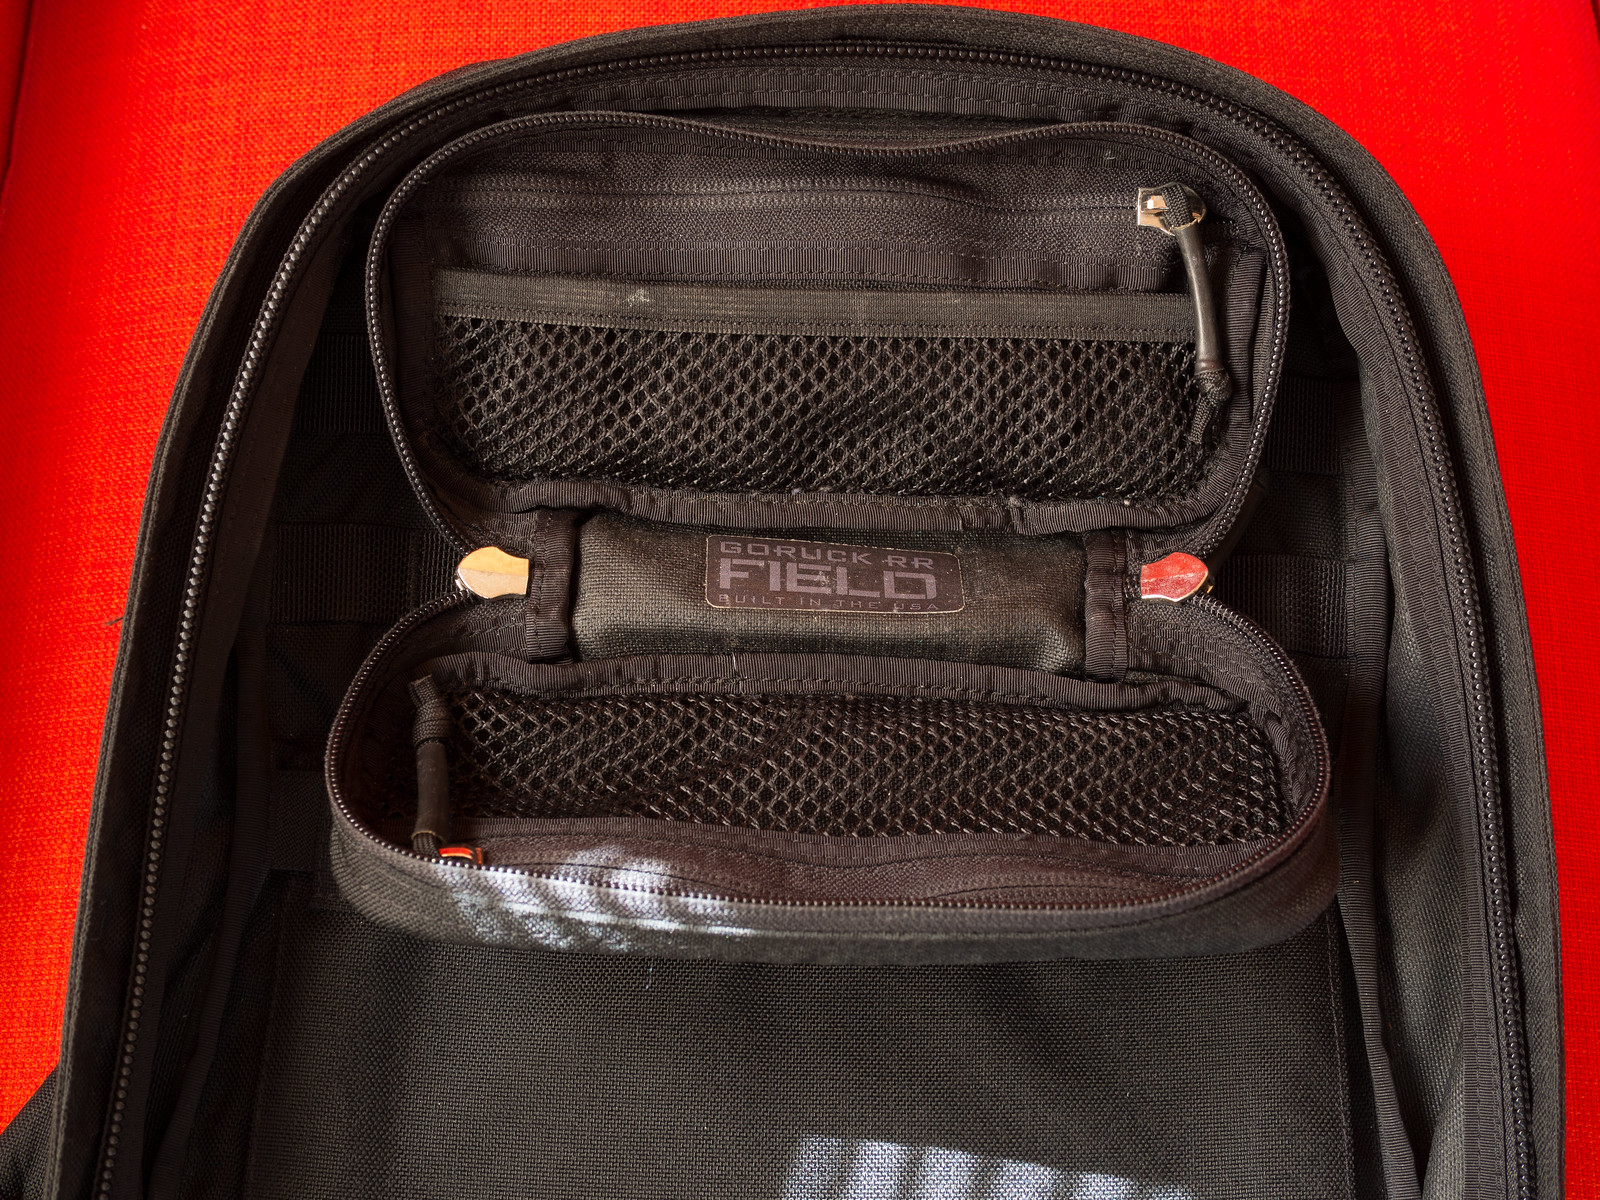
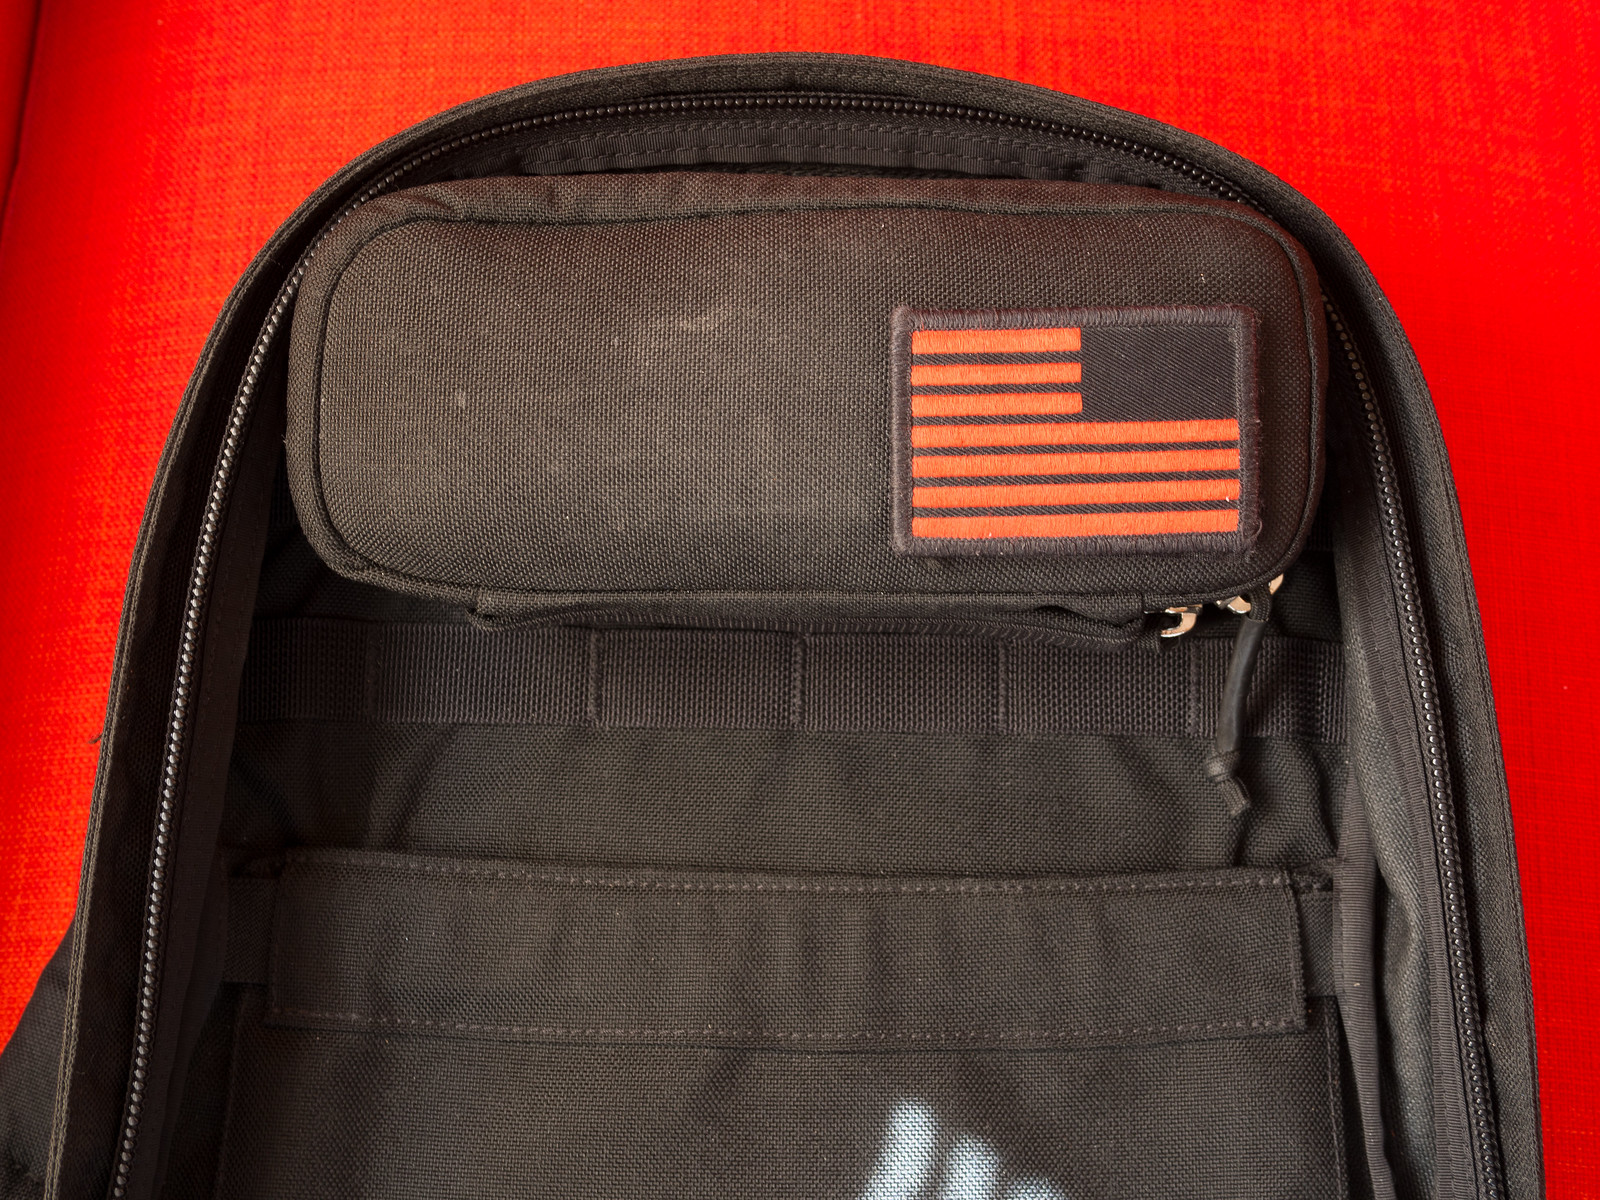
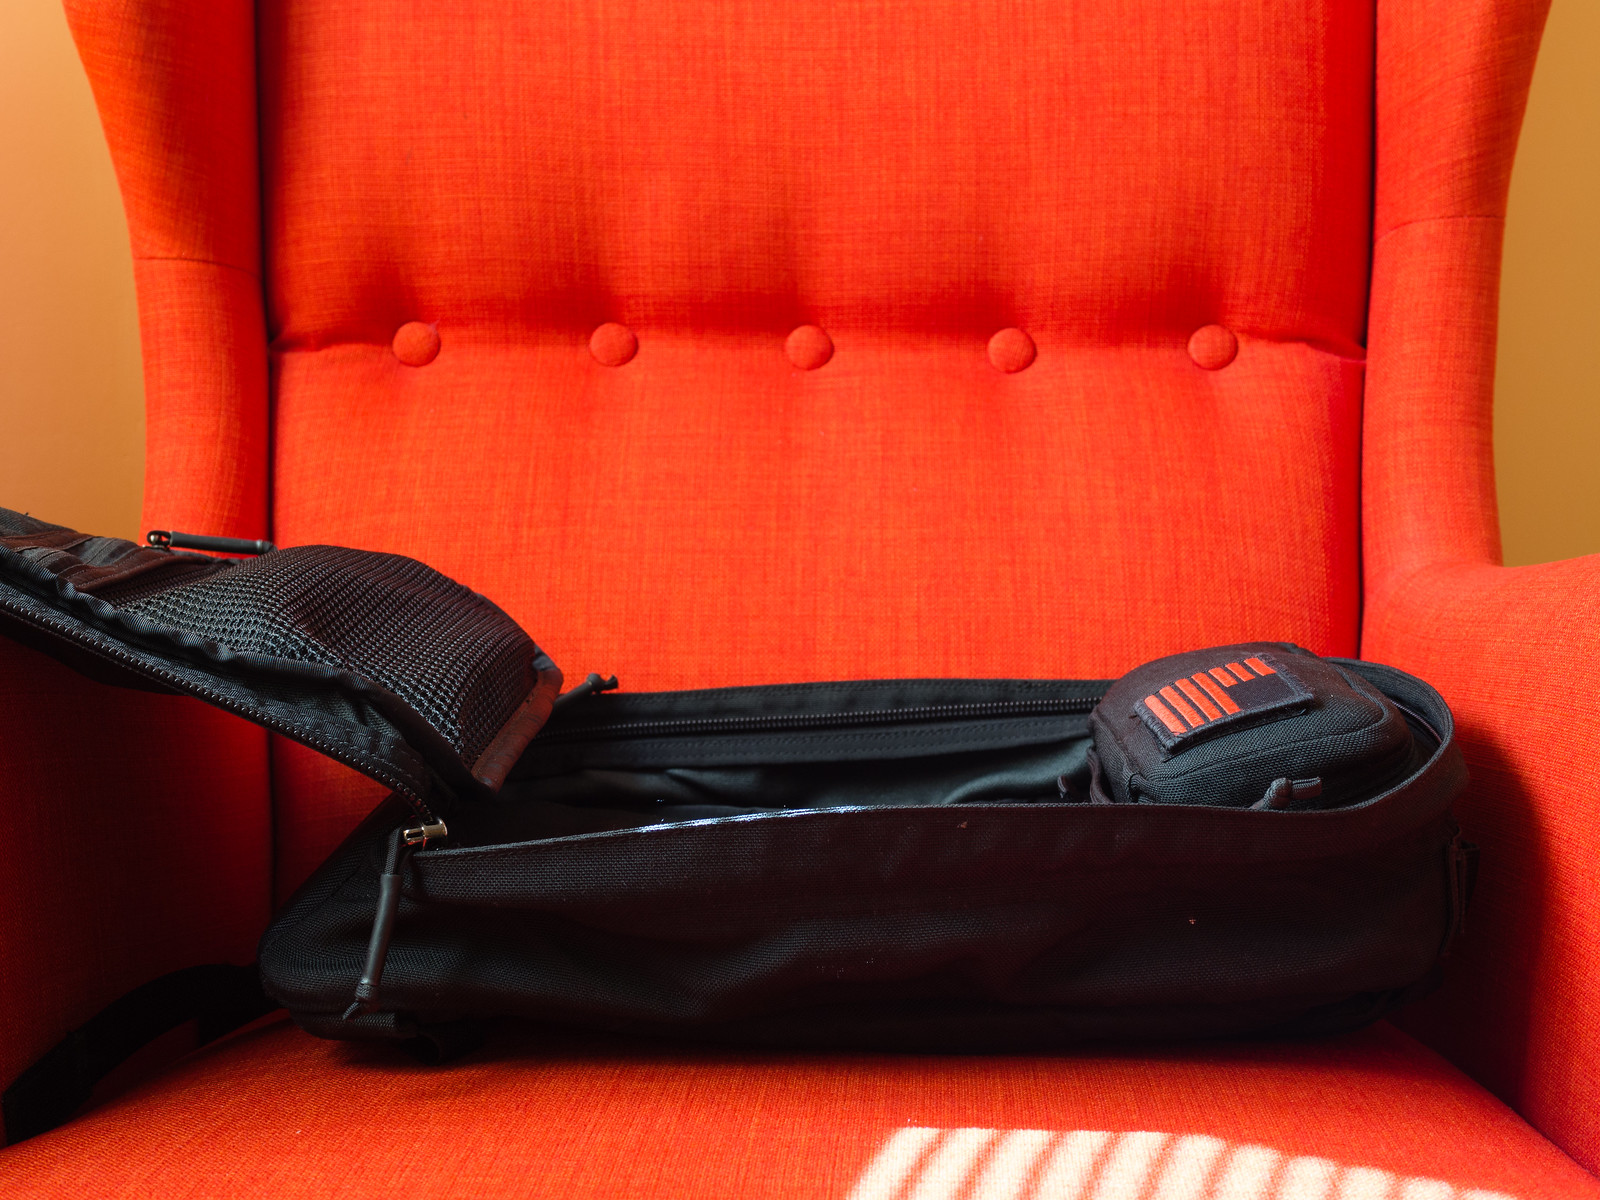
I carry my lenses, along with the E-M10, inside of a GORUCK RR Field Pocket, which is great. These pouches come in three different sizes, so you can pick the one that works best for you depending on your camera and lens selection. I chose the smaller one. It’s incredibly tough and highly-water resistant, so you can trust it to keep everything safe and dry. It works so well because it creates a snug fit with the camera and the lens that keeps things from sliding around in there when you close the zipper. It’s really close to being the perfect minimalist bag for your mirrorless camera.
Most days I take only one lens with me: the Panasonic Leica 25mm. This is an amazing lens, and its 50mm-equivalent focal length makes it perfect for many different situations. Besides, the color rendering and the character of this lens are already legendary in the Micro Four Thirds world, and with good reason. It really is an incredible lens to shoot with.
Some days, though, I choose to take the other two primes instead. The 45mm is perfect if I want to shoot a portrait, for example, of if I’m planning to shoot urban landscapes. And the pancake easily fits with it in the field pocket, so it usually ends up coming along for the ride in case I need something wider to shoot with. The combination of these two lenses is obviously more versatile than the 25mm, but the color rendering and character of the Leica are so unique that it’s difficult to leave it at home.
If there’s not a clear need for one particular lens or another, I’ll usually make the choice depending on my mood and what I feel like shooting with on that particular day.
Besides the camera and the lenses, there are several other items that every photographer needs in order to get the job done. This is what the rest of my kit looks like, but of course your mileage may vary:
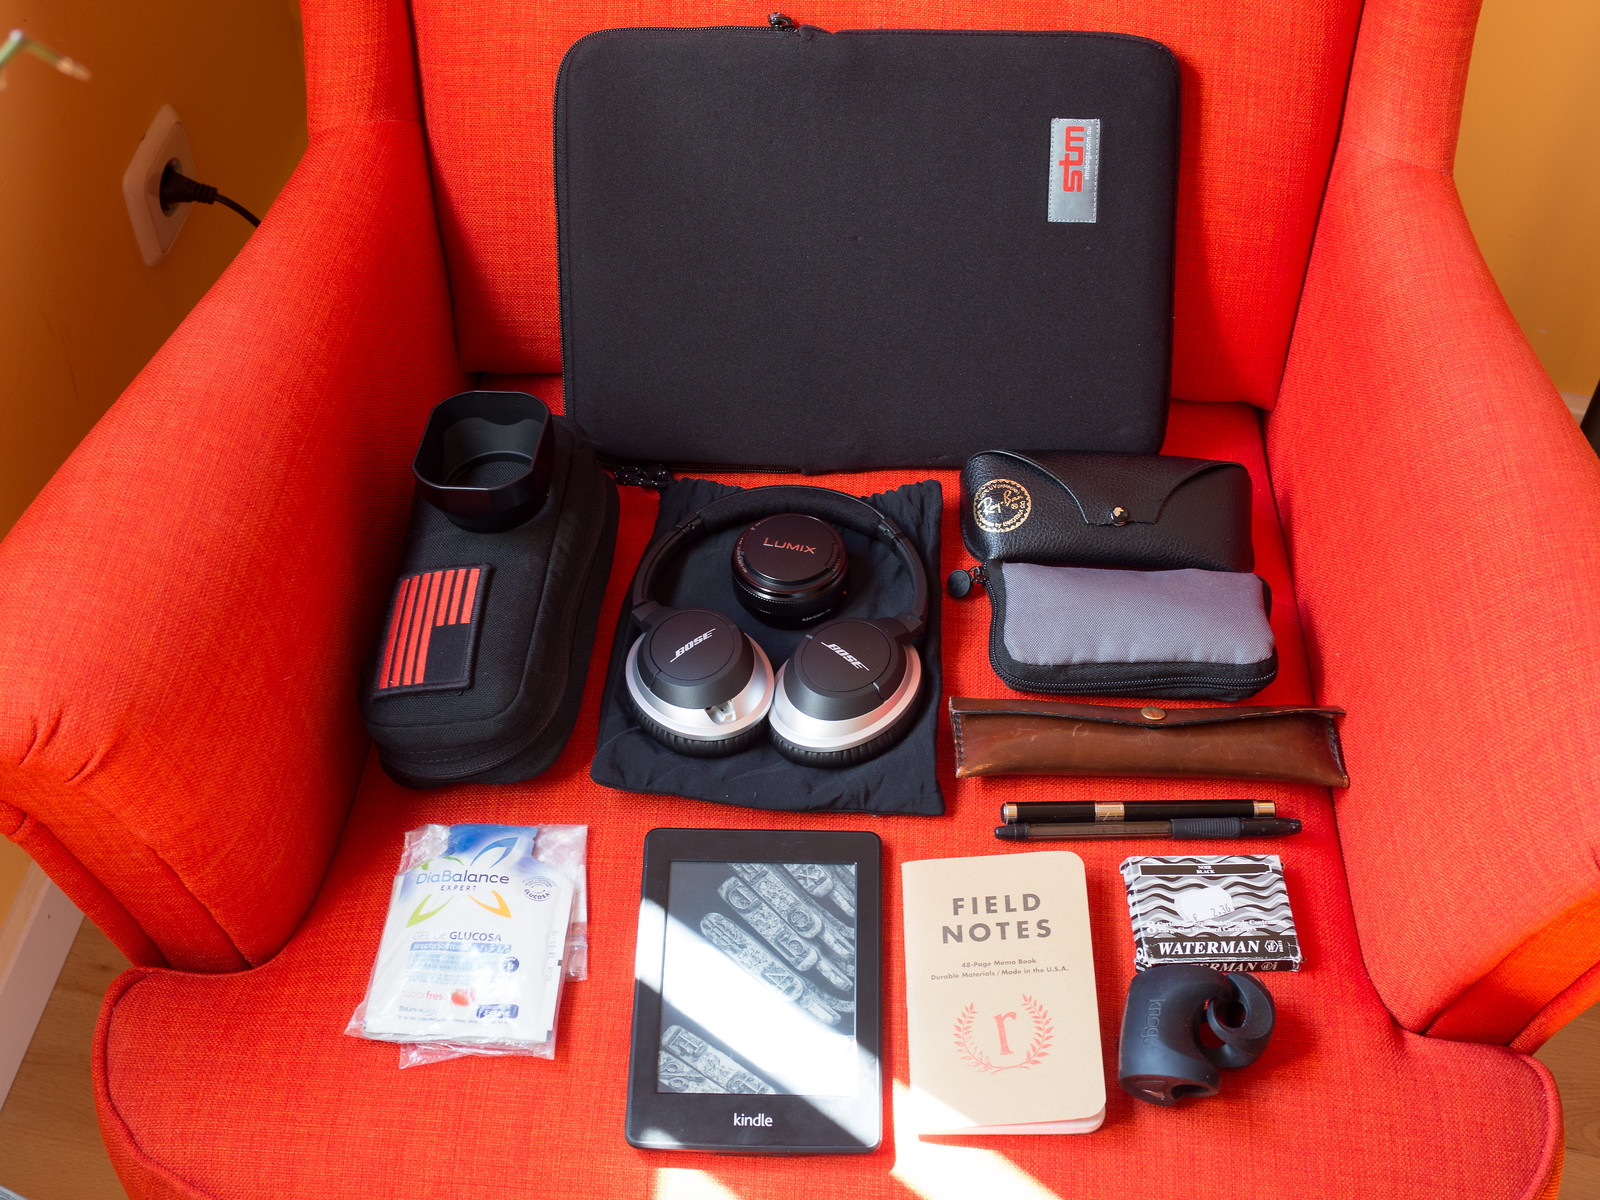
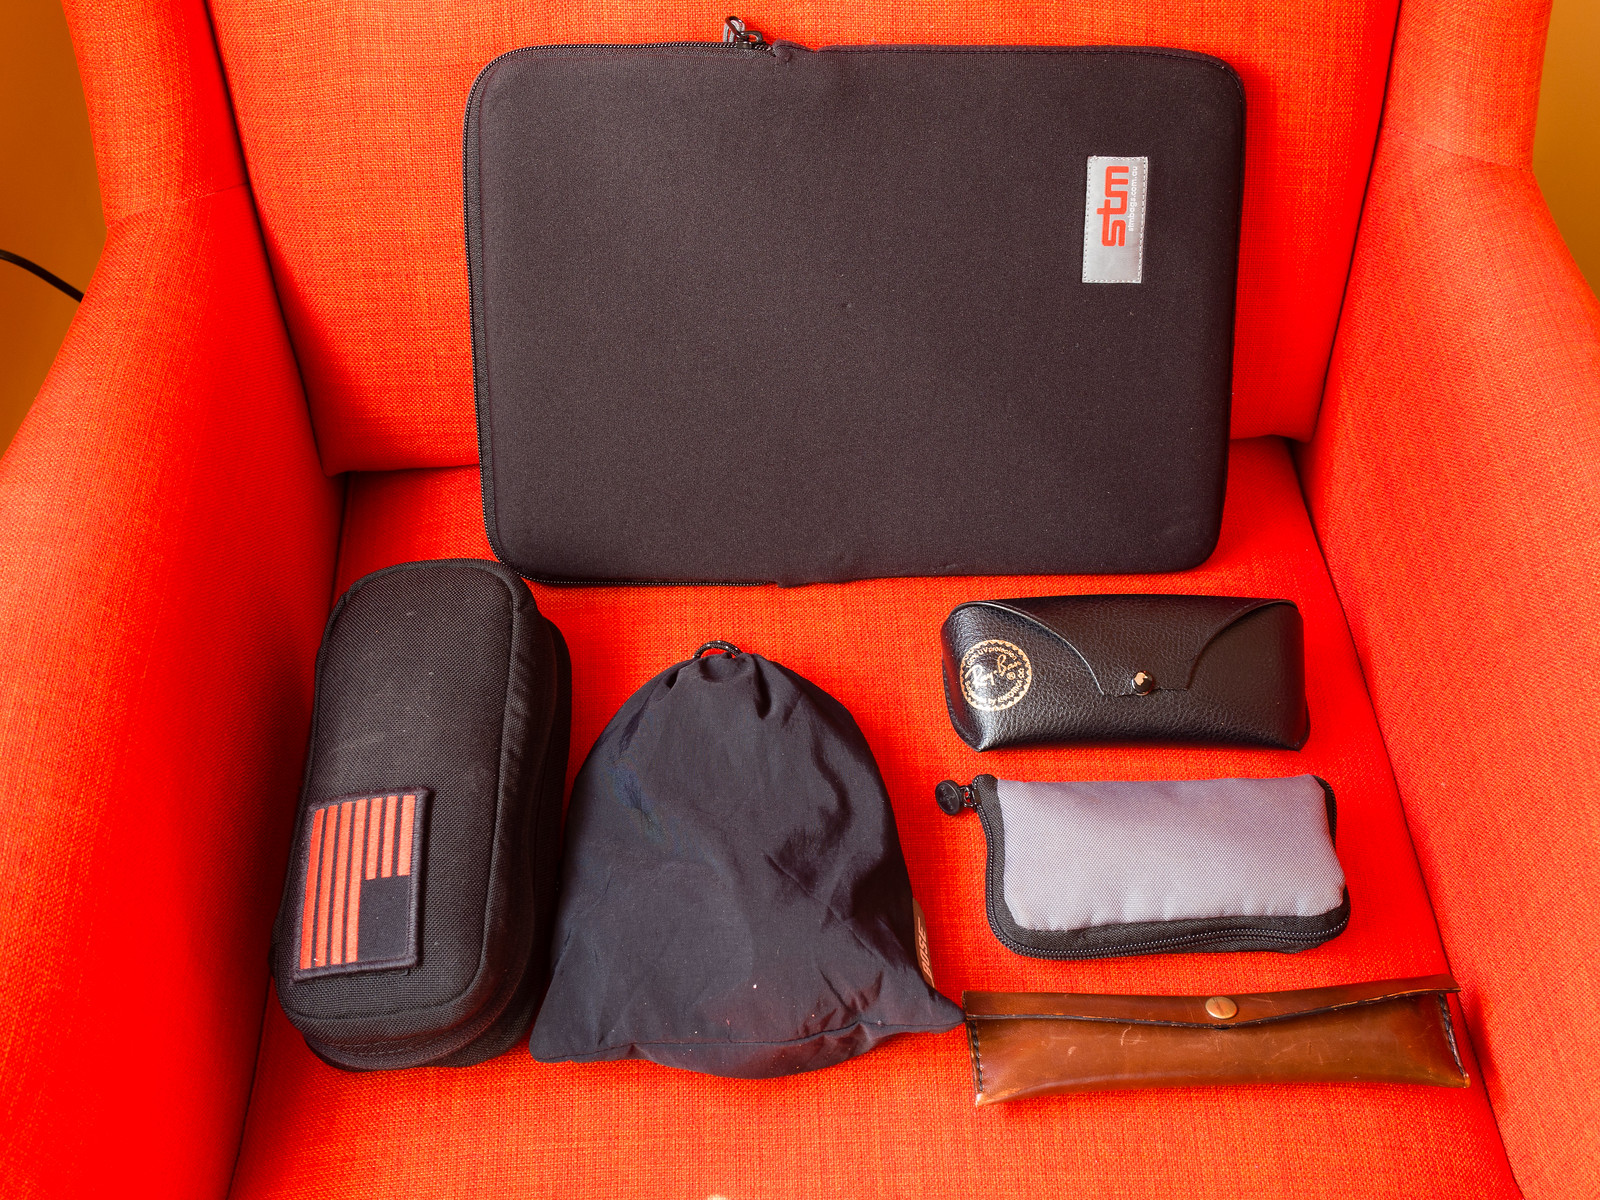
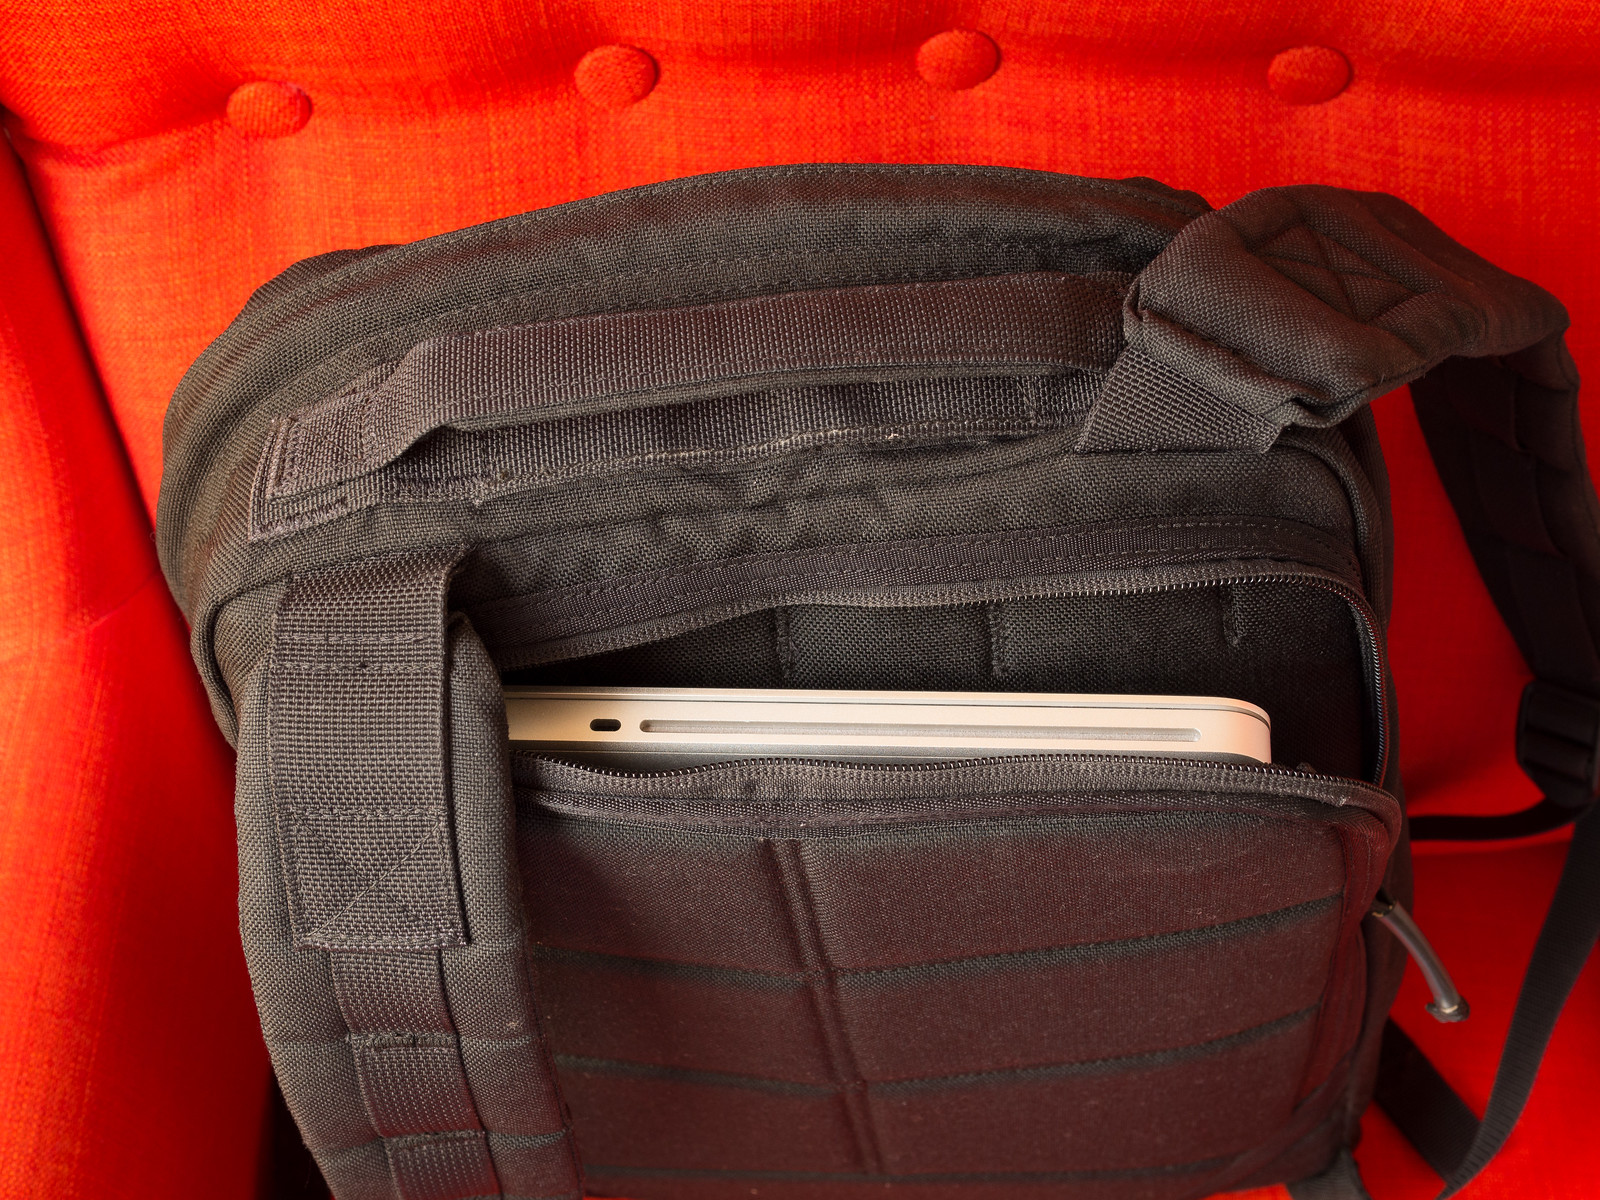
13” non-Retina MacBook Pro (Mid-2010). It’s an old machine and I’ve been drooling over the newer Retina MBP’s for quite some time, but it’s still in perfect working order and it does everything I need, so I haven’t been able to rationalize replacing it yet. A few months ago I upgraded its hard drive with an SSD, which made everything considerably snappier. All things considered, I’m pretty happy with it.
Bose AE2i over-ear headphones. These are very lightweight, extremely comfortable to wear over extended periods of time and sound pretty good, at least to my non-audiophile ears. They also have an inline mic and playback controls in the cable for added convenience. I purchased them at a steep discount and am very happy with them, but I don’t know if I would have paid the full price for them, since there were other similarly priced models with better reviews. Still, having now used them for a long time, I can recommend them without hesitation.
Ray-Ban New Wayfarer sunglasses. Not much more to add here.
Kindle Paperwhite. WiFi-only model.
Field Notes notebook. I use Moleskine notebooks as well.
Waterman Perspective fountain pen, ink cartridges and regular pen.
Set of LED lights for my bicycle.
At this point we have already covered the basics of a pretty good photography kit for the city. By now, you should be thinking about how you can make this your own and customize it to suit your particular needs, which are surely different from mine. Personal customization is an essential part of a photographer’s kit, since different people have different preferred approaches.
My kit, for example, contains several other items that I hope you won’t need. I have type-1 diabetes, so I need to take a few things with me in order to be able to control my blood sugar levels throughout the day. These items include:
Leather pouch for the insulin pens. I purchased it at a leather workshop in Barcelona, shortly after I was diagnosed. It’s entirely hand-made and it’s gorgeous. It fits my two insulin pens perfectly.
Glucose meter pouch. I also have a few needles for the insulin pens in here.
Liquid glucose packs. In case I have a hypoglycemic episode and I need to quickly raise my blood sugar. These are inside a clear zip-lock plastic bag because unfortunately they tend to leak sometimes, and things can get messy.
Putting everything in the right place is often underestimated, but I believe it’s important. A very complete kit is not very useful if it takes you forever to find what you’re looking for, so good organization is a must.
The items I carry in the main compartment of the bag are the MacBook Pro, the RR Field Pocket (with camera and lenses inside), the headphones, the glucose meter pouch, the insulin pens and the sunglasses.
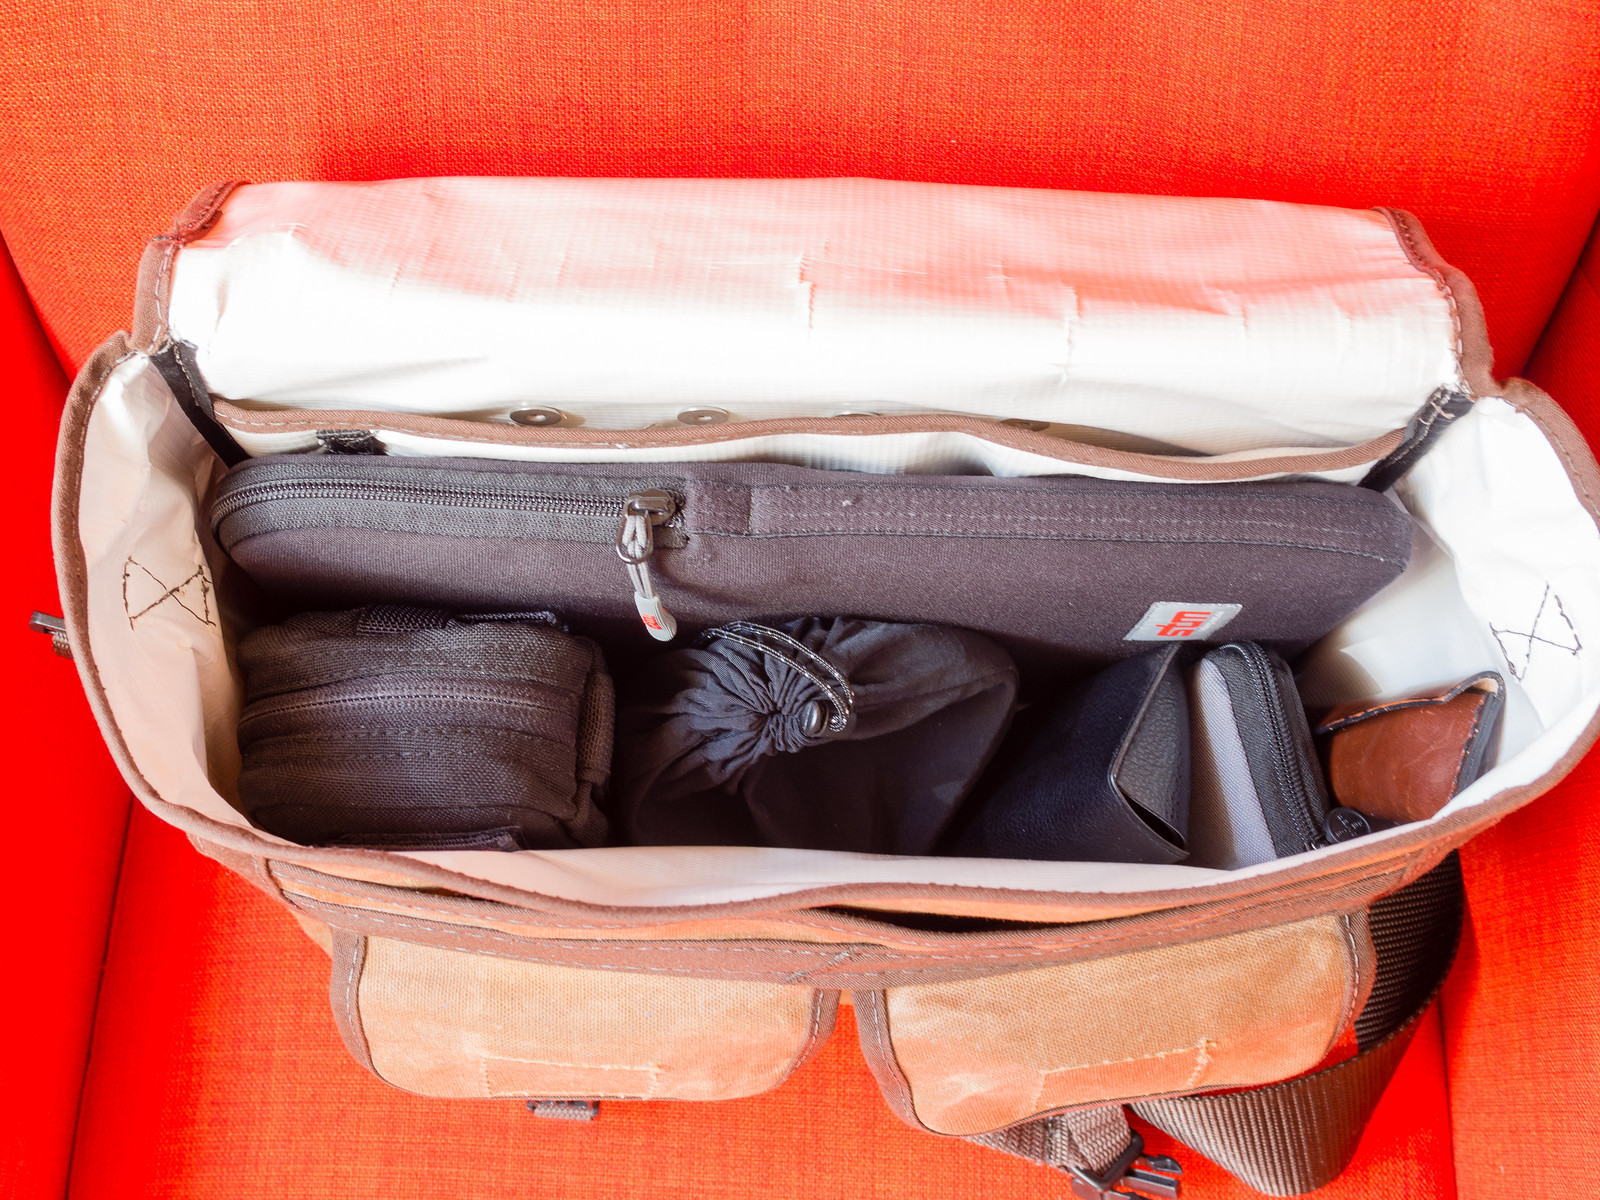
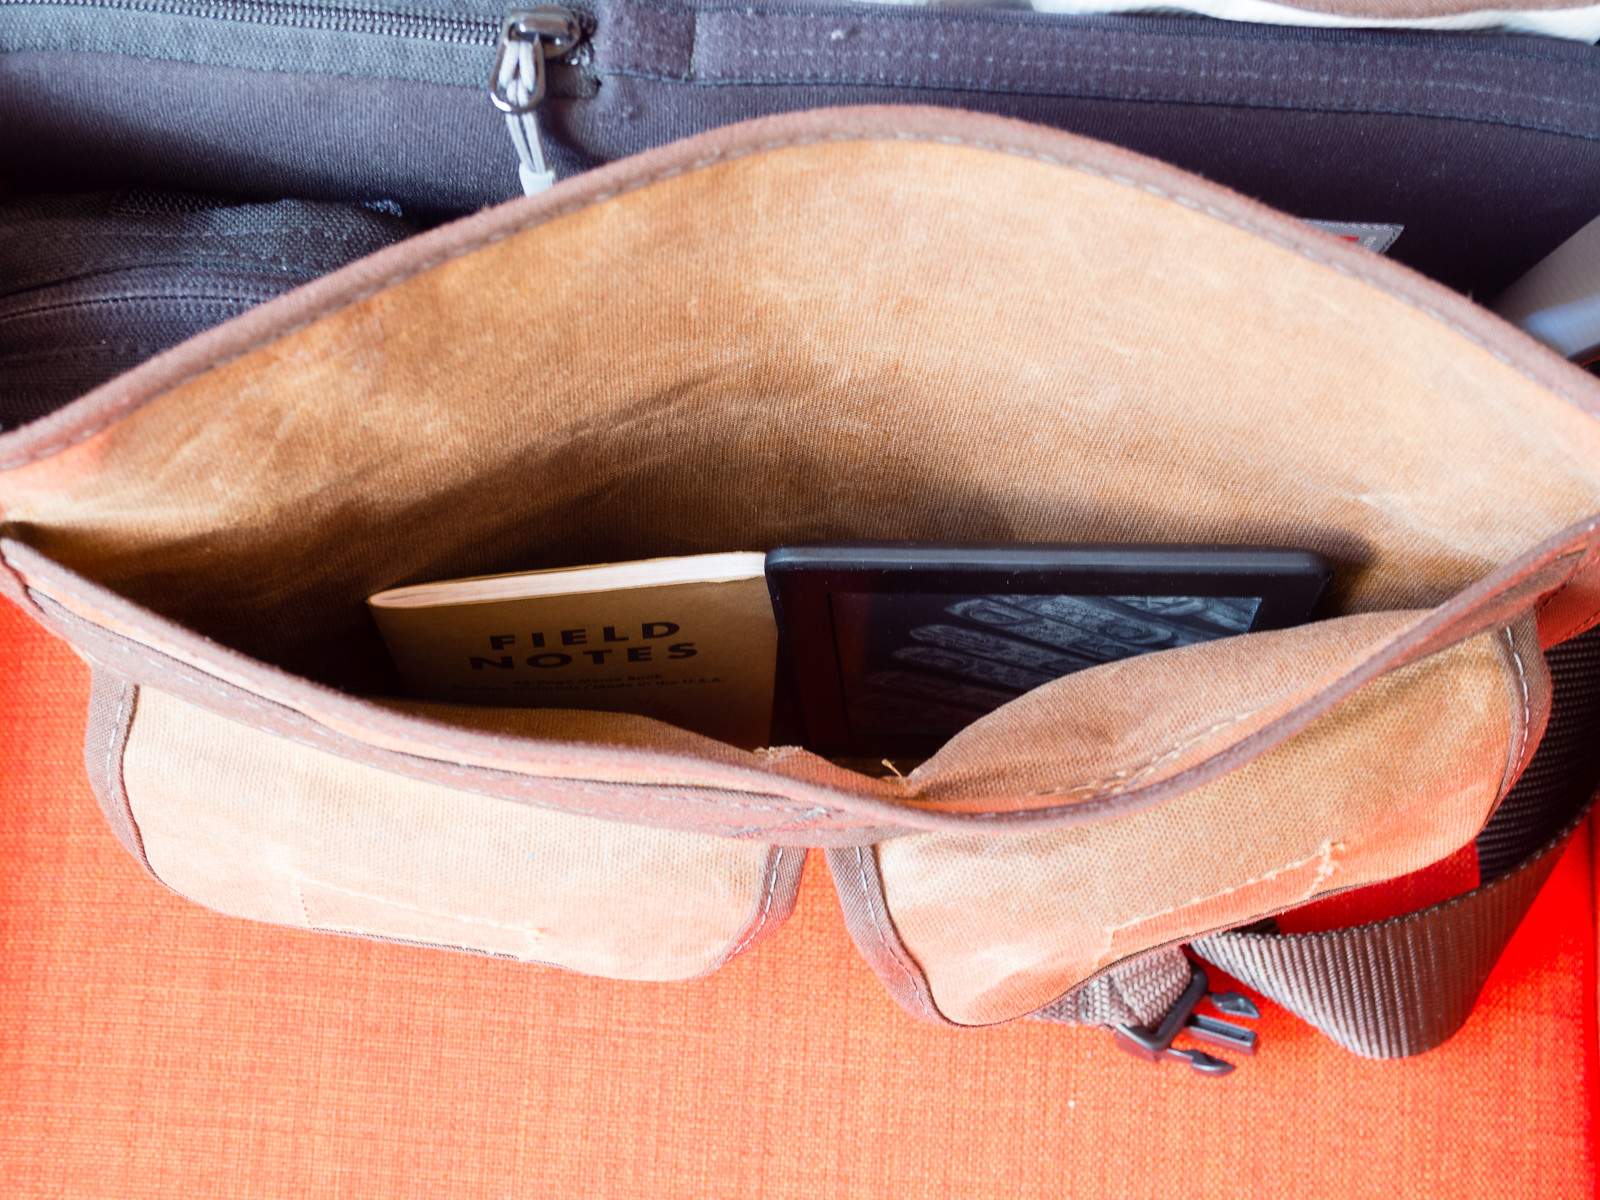
The Field Notes notebook and my Kindle Paperwhite are in the secondary sleeve compartment.
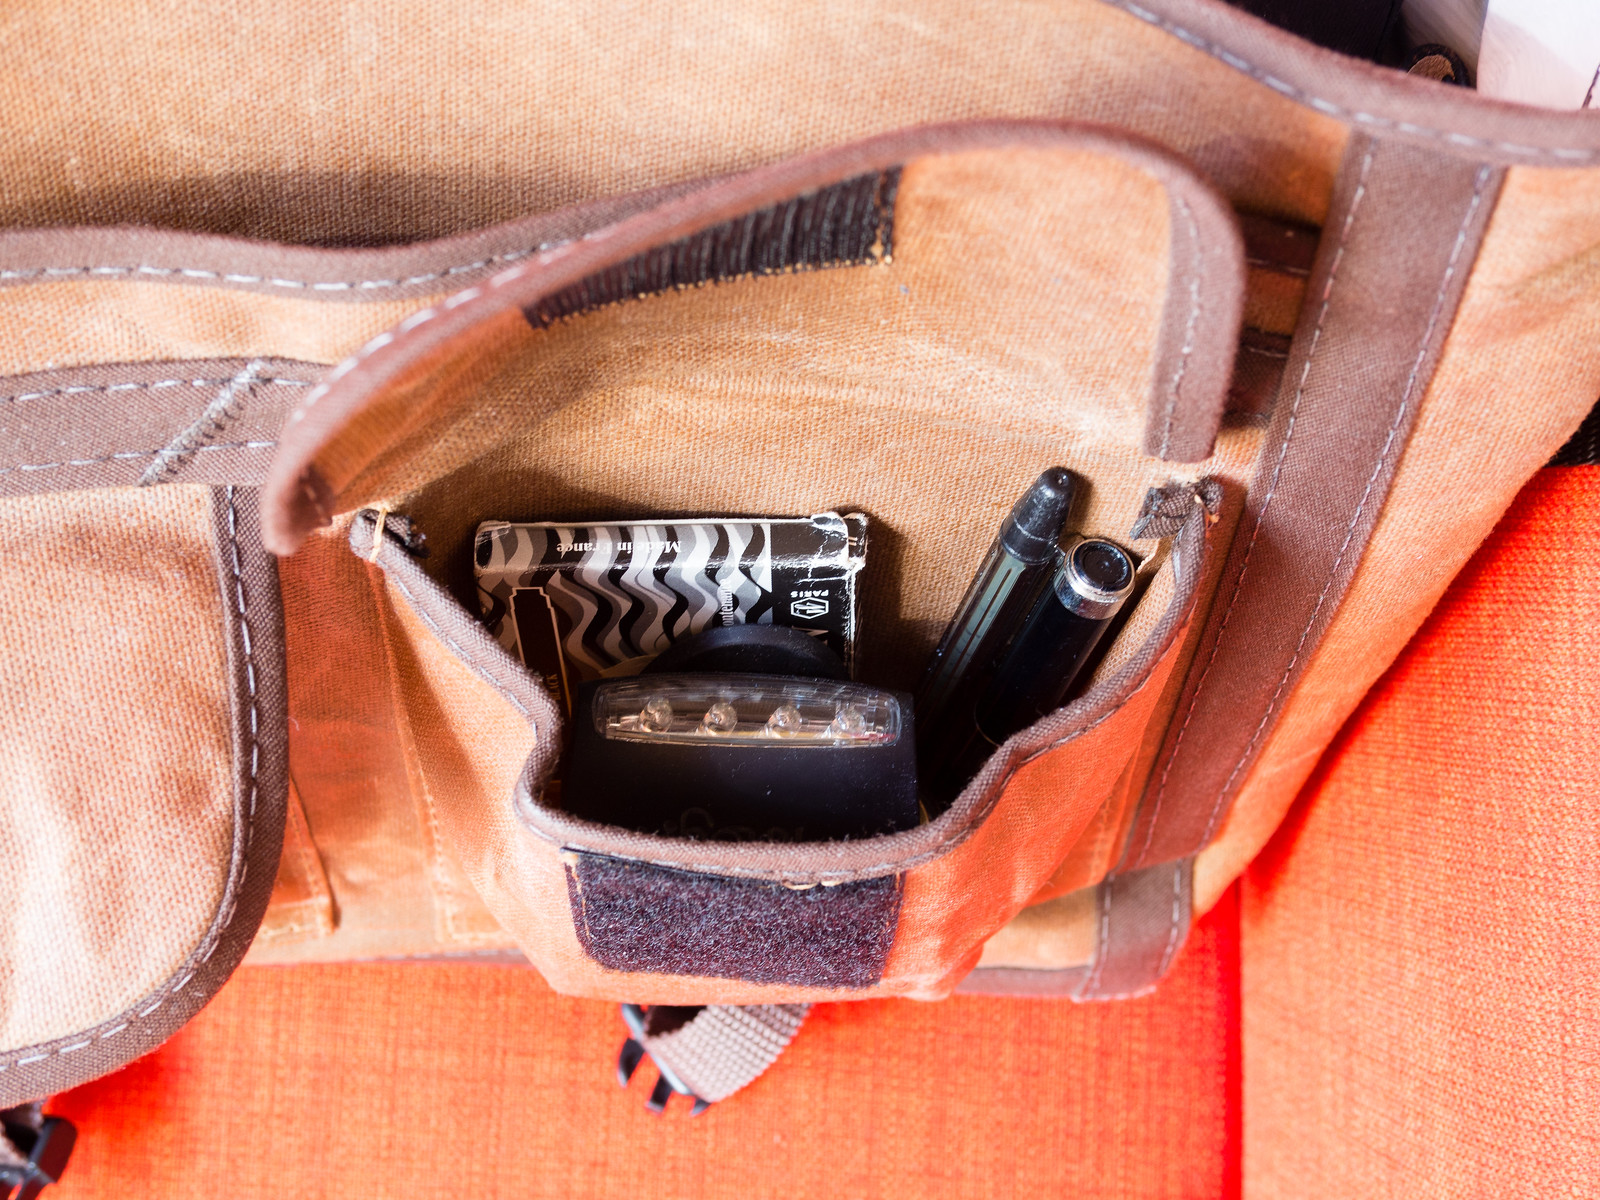
Finally, the rest of my stuff is in the secondary pockets: glucose packs, pens, LED lights and occasionally, the lens hood of the Leica.

With this organization, things fit nicely in their proper place and they don’t move around too much, even when I’m pedaling my way across the city. Knowing that my gear is safe gives me peace of mind so I can focus on getting from point A to point B without distractions. Besides, the bag has a nice, stylish look that I really like; I feel that I can take it with me anywhere without looking too out of place or drawing too much attention to myself. That’s also important sometimes.
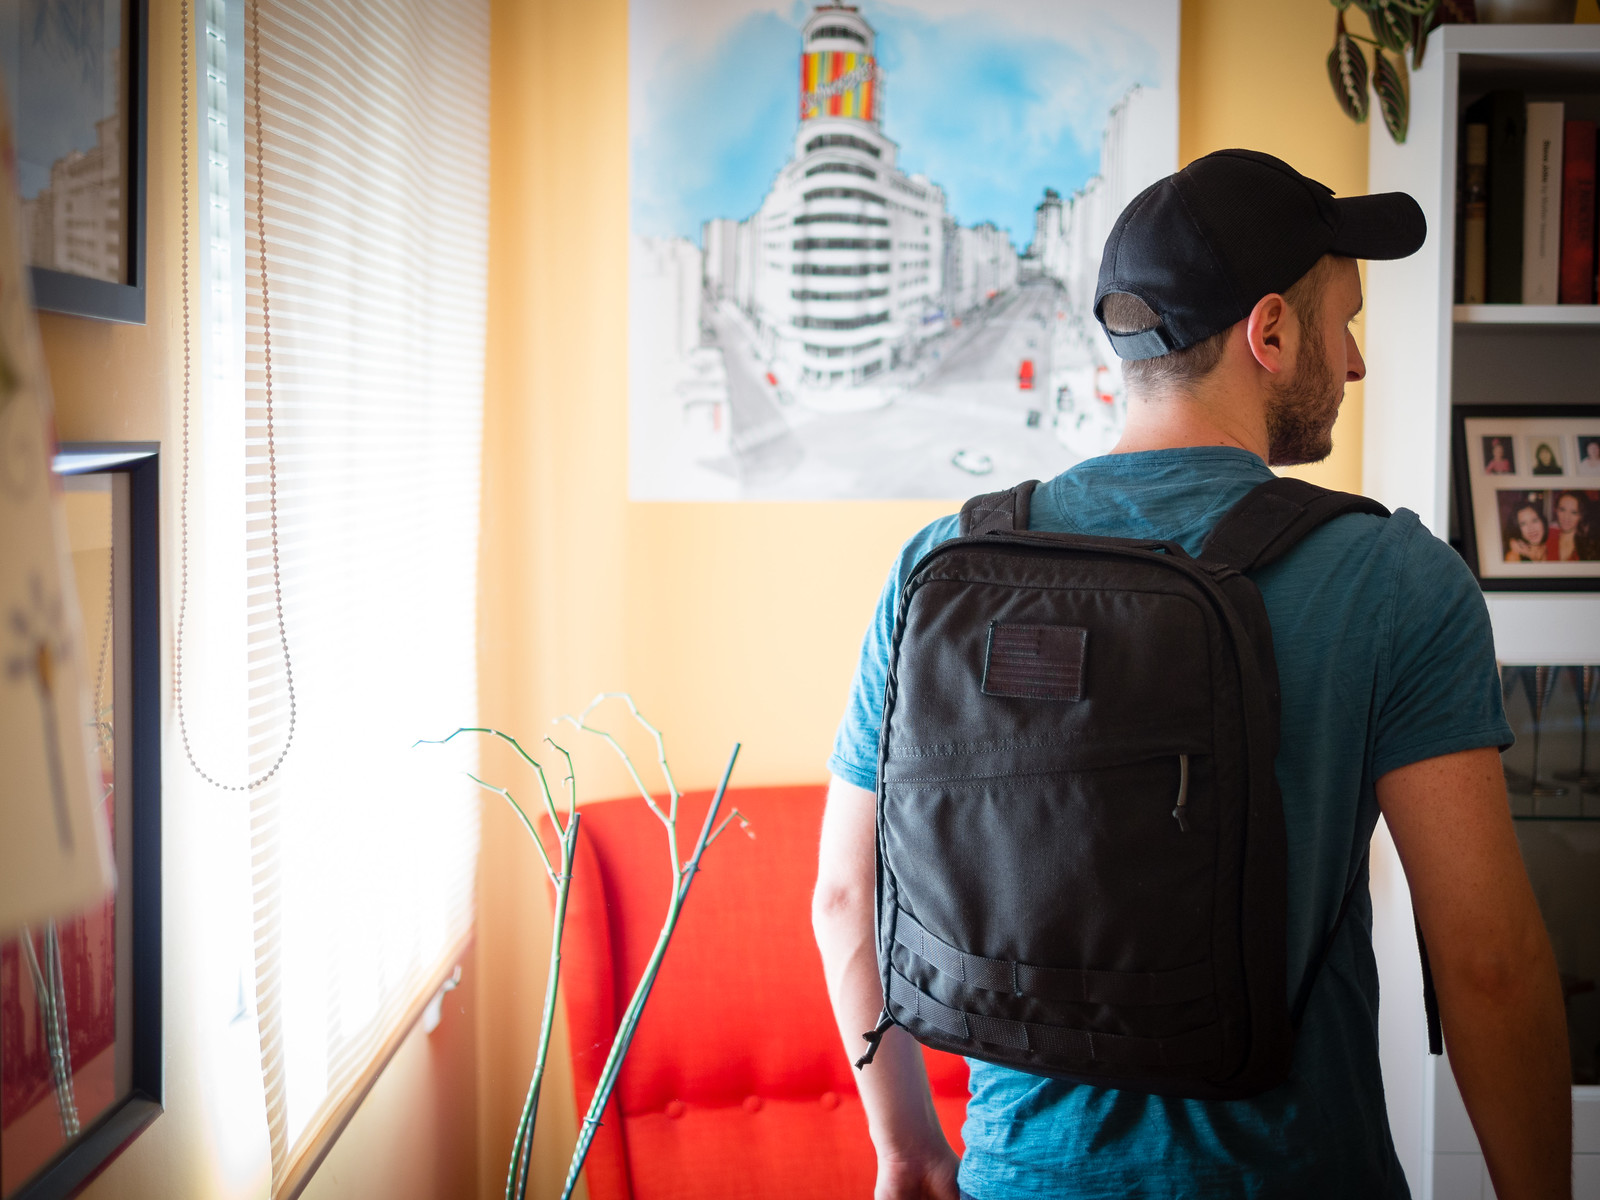
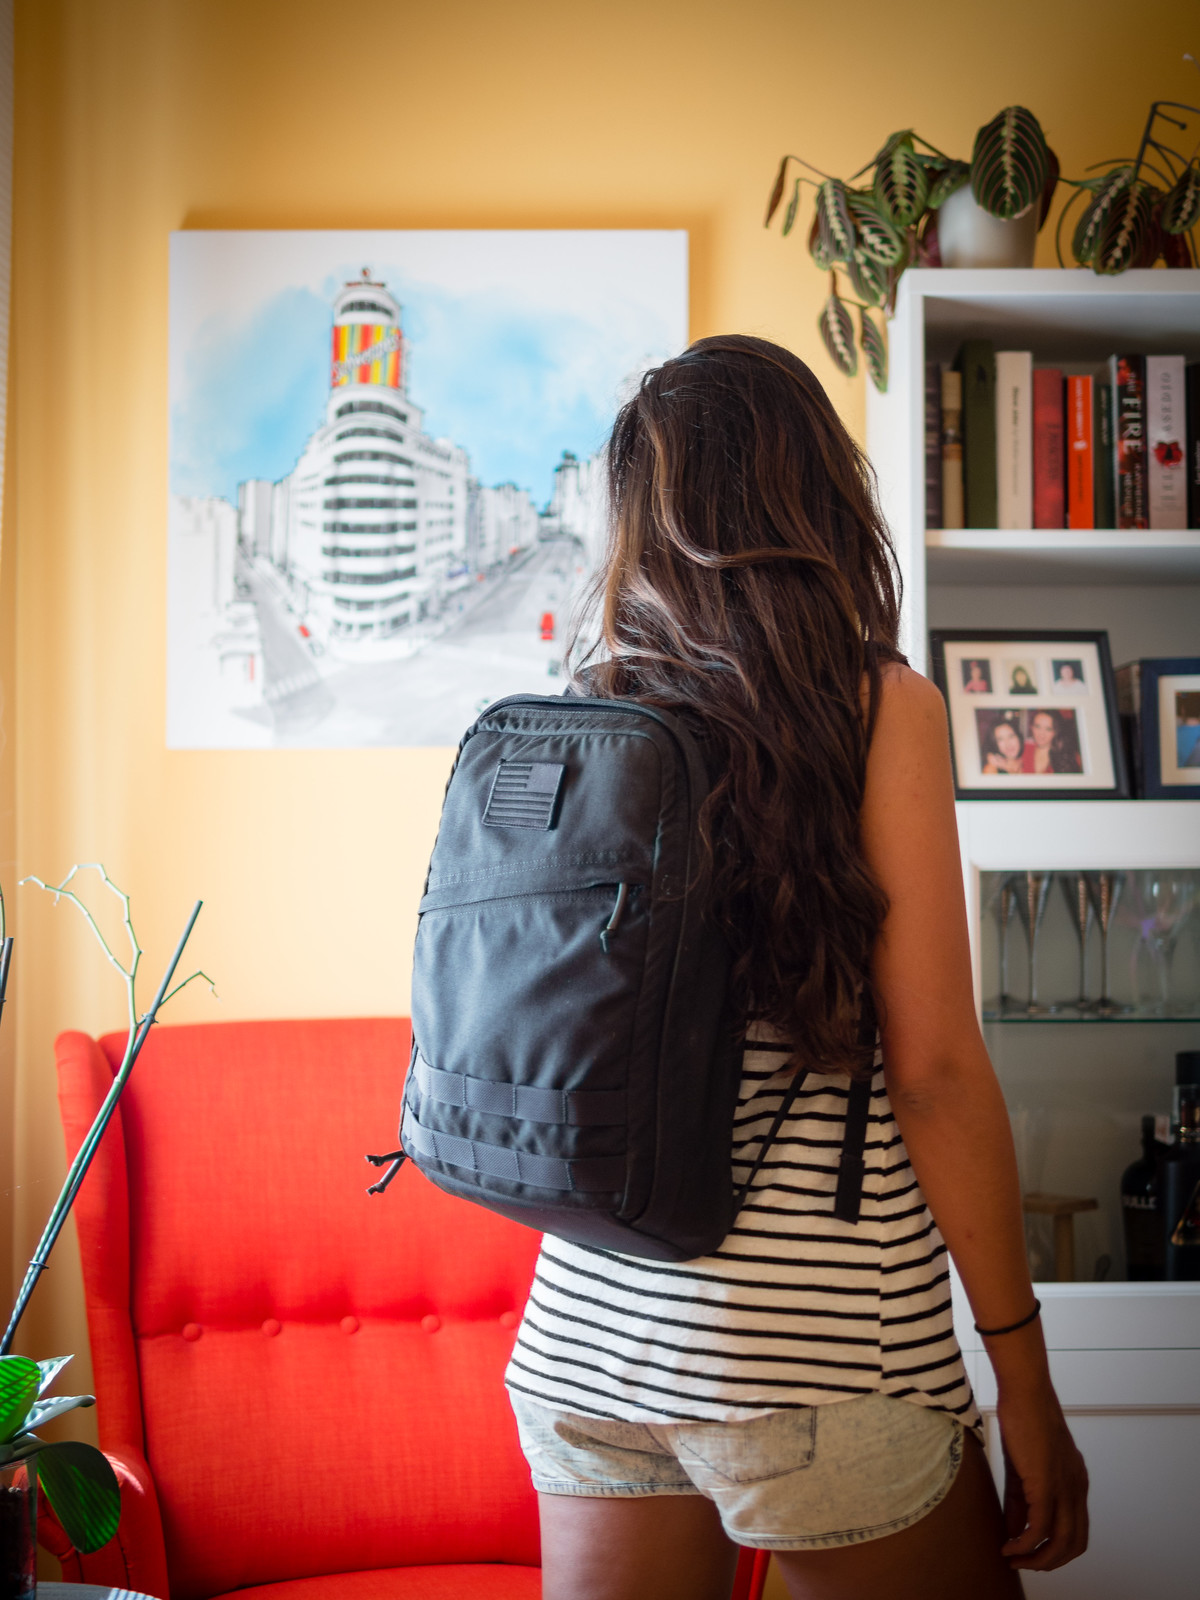
On some occasions, like when it’s raining, or on those days when I know I’m not going to use the bike, I usually ditch the messenger altogether and use a backpack instead. My backpack of choice is the GORUCK GR Echo, and it’s a fantastic bag. This section is meant to show you that my way of doing things doesn’t necessarily have to be what’s best for you. There’s ample room for customization here; you should take some time to figure out what you want from your bag, and choose accordingly.
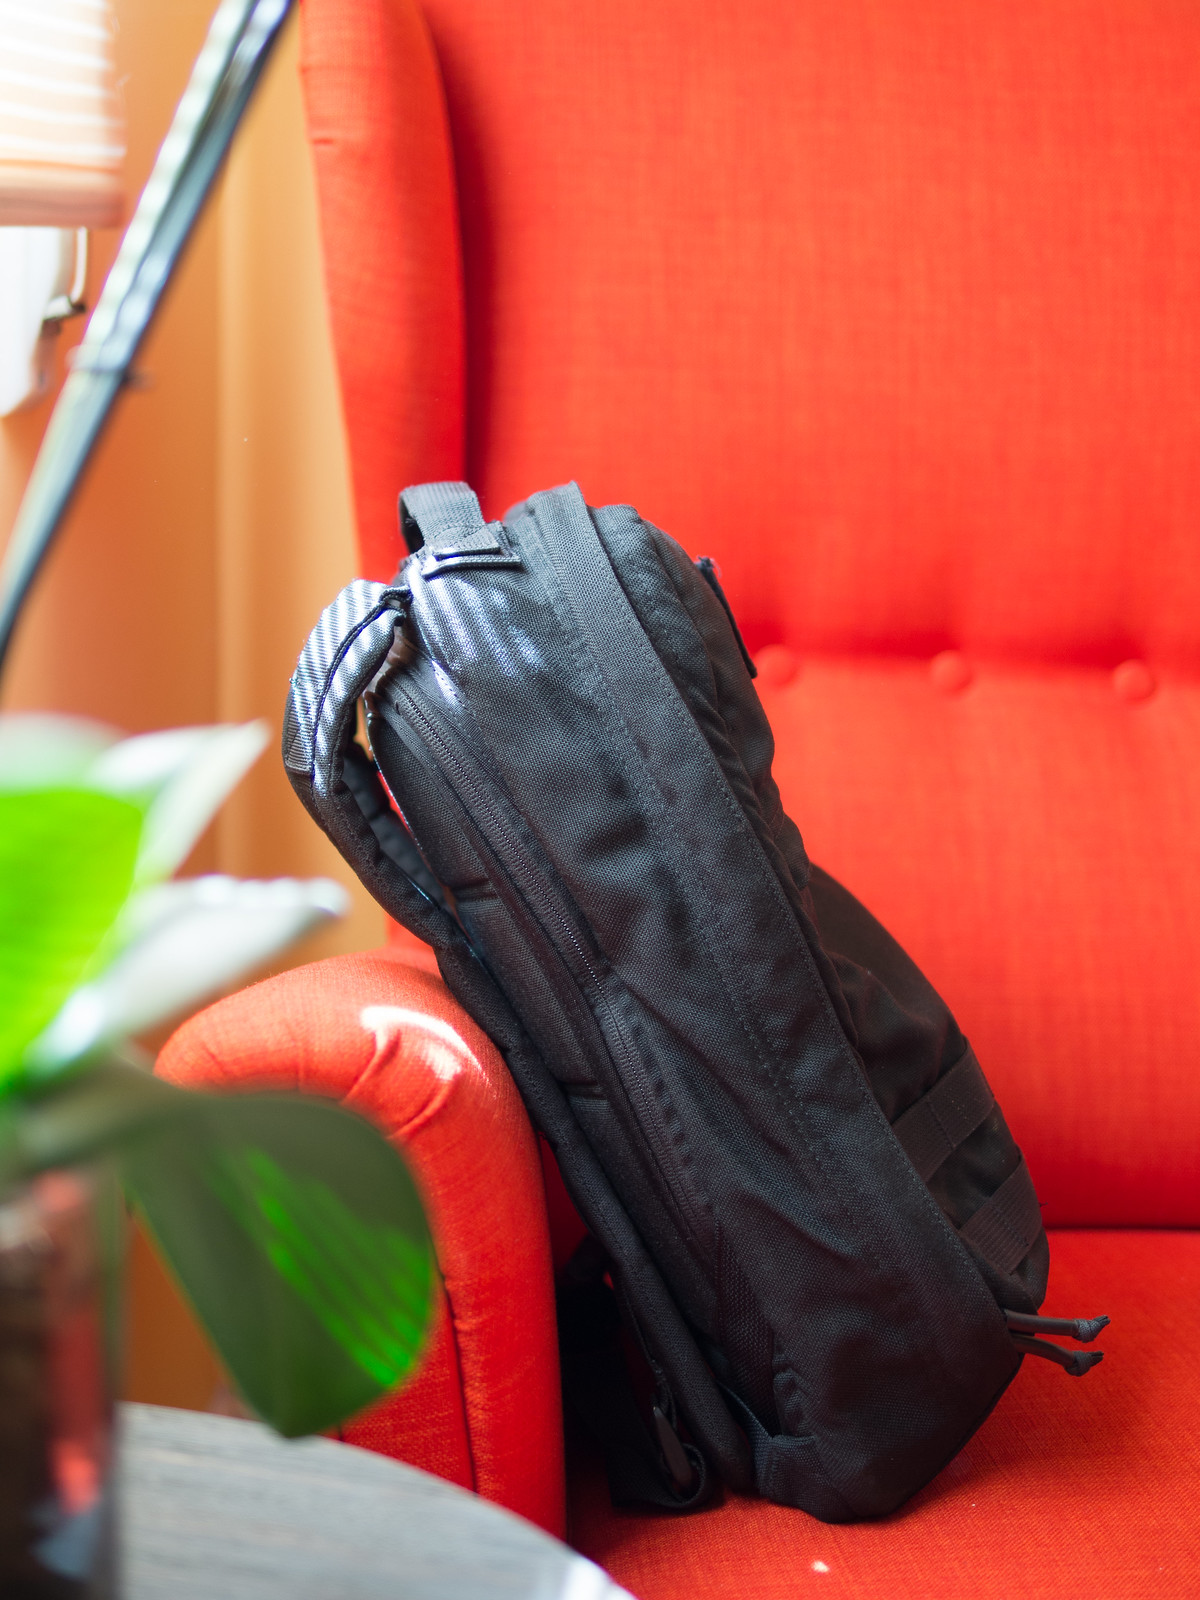
Much has been said about the GORUCK rucks and, as far as I can tell, most of it is true. These bags are amazing. The build quality is second to none, and they’re guaranteed for life. One of my favorite design features, especially in combination with the Field Pocket pouches, is the MOLLE webbing. It’s designed to easily and securely attach so that your gear stays where you put it, no matter what.
I own a GR Echo and a GR 2, and attaching the field pocket to any of them instantly turns them into fantastic camera bags. This is a great example of GORUCK’s design philosophy: it’s the gear that adapts to you, if you take the time to experiment and make it yours. If you appreciate good quality and craftsmanship, I highly recommend them.
Another great thing about the GORUCK rucks is that they open completely flat. This is a huge feature to have when you’re carrying a bunch of stuff inside, because it allows you to find anything almost instantly. No need to hunt for things inside the bag anymore.
The Echo is great little bag that looks deceptively small, but is capable of carrying plenty of gear. Here’s how it looks when holding all of my kit:

You could be forgiven for thinking it’s empty. It’s actually fully loaded with everything you saw before, but it’s still got plenty of space left. Light and fast. That’s how you want your bag to look like.
The MacBook Pro sits comfortably in its own padded compartment, tough enough to withstand a small nuclear bomb.5
One of my favorite things about this system is that your camera and lenses will always be easily accessible from the top of the ruck: just unzip the main compartment and the Field Pocket and you’re good to go.
So there you have it, another great way to carry your photography gear across town. The GR Echo is slim and discreet, and you can take it with you almost anywhere without arousing suspicion. That’s what I really like about using a regular bag instead of a dedicated camera bag: sometimes you don’t want the whole world to know you have a really nice camera in your bag.
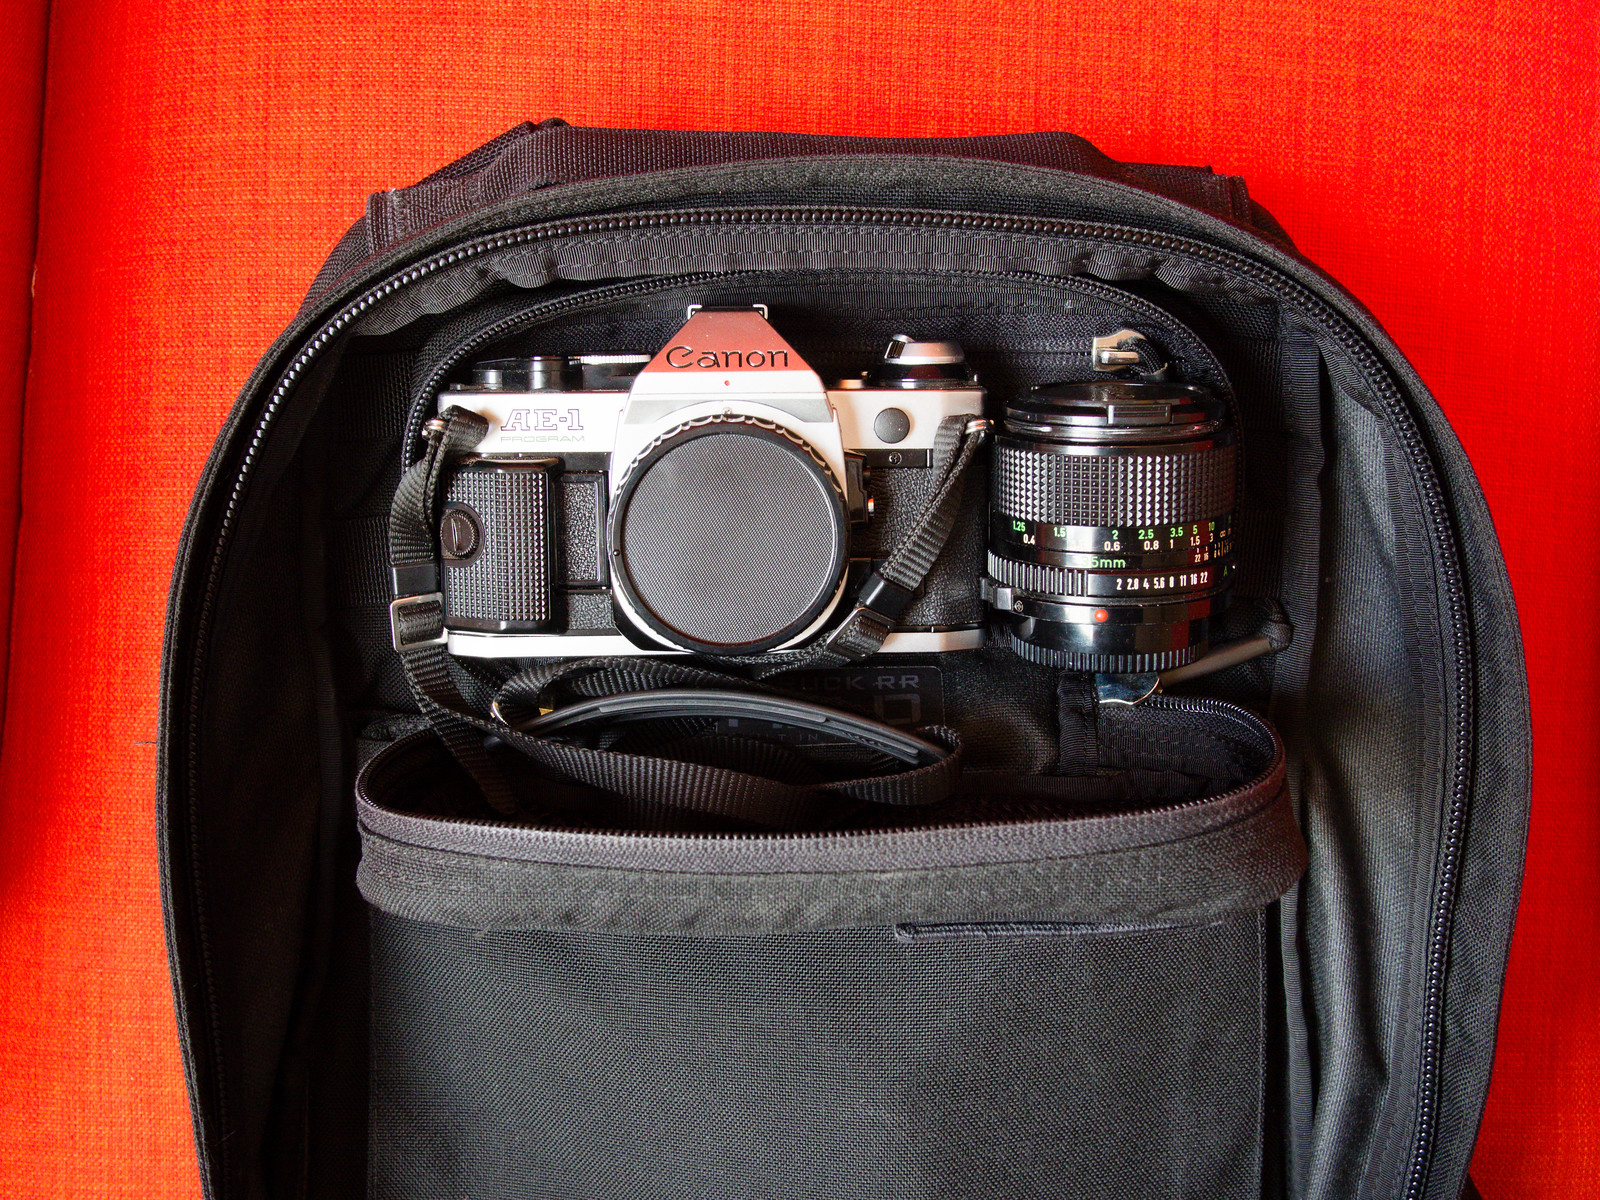
Lately I’ve been experimenting with an old analog SLR that belonged to my father. It’s a Canon AE-1 Program, one of the most popular 35mm film SLR’s from the 80’s. It’s in absolutely mint condition and it just pained me to see it unused, so I grabbed it a couple months ago and I’ve been playing with it since then.
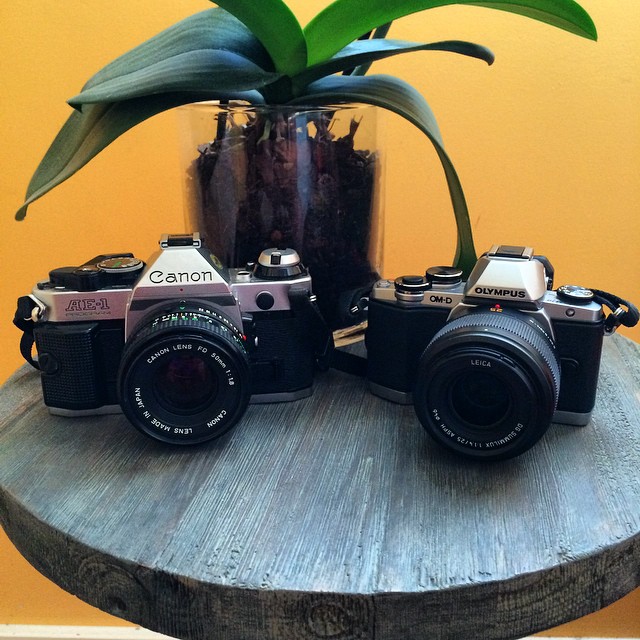
Fortunately, this camera also fits inside the RR Field Pocket without any issues, maybe even better than the E-M10. Despite being a 35mm film SLR — this sensor size is what we’d call “full-frame” in the digital world — the body of the AE-1 Program is remarkably compact. As for the lens, I’ve been shooting with the kit lens, a Canon FDn 50mm f/1.8, which is pretty good, giving sharp images and decent bokeh. I also recently purchased a used Canon FDn 35mm f/2.0 lens on ebay, which is fantastic for street photography. It’s the fastest Canon FD lens in this focal length, but it’s even smaller — although a bit heavier — than the Panasonic Leica 25mm f1.4 for Micro Four Thirds
Shooting with this camera is awesome. It’s manual-zoom only, and it supports full manual operation as well as full auto-exposure and shutter-priority modes. I love it. I usually shoot in shutter-priority mode. I’ll probably end up going full manual, but in the meantime, having these extra modes is certainly helpful.
So far I’m loving the experience of shooting film, and I would recommend anyone to try it. The good news is, you can get a high-end 35mm film SLR and a pretty good lens for under $100 on ebay, easy. I think it’s a great creative exercise because it forces you to be much more thoughtful and deliberate about your photography, and that’s good. Full auto-everything doesn’t make you a better photographer; being 100% responsible for the image you capture does.
In this article I’ve tried to show you how to build a lightweight photography kit that works for yourself. To me, a versatile photography kit is one that allows me to have everything I need, while staying light enough for me to comfortably move around the city. One of the things I particularly enjoy about this kit is that I never feel creatively limited by my gear. That’s a great feeling to have when you’re out there shooting.
As you’ve seen, my kit is pretty light, but yours could be even lighter. There are always opportunities to shave a few ounces here and there. All the diabetes-related stuff is weight you probably don’t need, so use it to your advantage. If you shoot JPEGs, for example, you may be able to use Lightroom on your iPad instead of the MacBook Pro. That’s a massive weight reduction right there.
On the other hand, you may need to take other items that I have not mentioned here. It’s possible to do that, too, while keeping things reasonably light. I normally work at places that have WiFi networking available for customers, but if you need to you can pack an LTE Mobile hotspot without adding too much bulk. You could also fit a small tripod, a couple extra batteries, memory cards and filters, along with some basic lighting equipment, and the bag would still be comfortable enough. This is not to say that you have to take everything with you every single day. Quite the contrary, in fact. You can — and totally should — slightly modify your kit depending on your schedule. In the end it’s all about finding what works best for you in each particular situation.
At the end of the day, the best advice I can give you is this: be aggressive about streamlining your kit, and don’t be afraid to leave things out of the bag. You’ll be surprised by how little you actually need to get the job done. And then, just worry about your photos instead of your kit. Which, after all, is the whole point.
Throughout this article I will assume that you’re shooting with a mirrorless camera. If you’re concerned with keeping things light, chances are that’s probably what you’re using. These days mirrorless cameras are great, and provide more than enough quality for practically any type of photographic work. Of course, there are several areas such as high-ISO performance and shallow depth of field effects where full-frame DSLRs will always be better. For the purposes of this article, however, achieving a great balance between quality and portability is more important.↩
Disclaimer: All Amazon links in this article are affiliate links, which means if you buy anything from one of those links, I’ll get a small kickback from Amazon. This will earn you good karma and it will help me keep the lights on around here. Thank you!↩
The kit zoom, the new Olympus 14-42mm EZ, is a decent lens and it’s pretty compact, but it doesn’t see much use and is probably redundant in my kit. I should get rid of it, but it’s still nice to have in case I want to build an extremely lightweight kit for a trip. However, I suspect that even then I would choose to take one of the primes instead. They’re just so much nicer and it’s not like they’re actually heavy. After all, size and weight are two of the great features of the Micro Four Thirds format.↩
One way to make it “better” (read: more versatile) would be to change the 20mm pancake for a slightly wider prime, such as the new Panasonic Leica DG Summilux 15mm f1.7. However, the pancake is such a nice lens that I’m having trouble parting with it. It was the first lens that I owned (other than the kit zoom) and I have developed a certain emotional attachment to it. I find it to be extremely sharp and with a character that I really like, and it fits inside of a jacket pocket. If you absolutely must stay as light as possible, it could very well be the perfect lens.↩
PLEASE don’t try this at home.↩
Allen Ding shares his hard-learned lessons as an indie developer in the App Store:
The thing is this: I see where I have sucked. I’ve gained valuable knowledge about the business. And the mistakes I’ve made are correctable. The app needs a kick-ass design. I need a concerted, smart marketing approach. I need the product to truly make even more of difference in my user’s lives. None of this is easy mind you, but each is definitely doable and quantifiable. My future work will be better.
Being aware of the problem is always the first step towards the solution.
Chris Gampat:
If you want better pictures, just go out and get a camera and a lens and whatever you need to create the scene that you want. You know why? Because no one is making bad products anymore. In this stage of the global economy, no one can afford to screw up. So instead, go train yourself to be a better photographer.
Agreed.
Speaking of Kevin Cornell, here’s his personal farewell message to A List Apart. Perfect.